Clique Kits

Click. Connect. Create.


Leave a comment

Wander

Hi everyone. I’ve been waiting since May to scrapbook these adorable alpacas. The Sundance kit was perfect for these photos. I love the patterns in this collection and decided to use a variety of patterns for the background of my layout. I love patterned paper…


One of my favorite types of die cuts is frames. I love creating a collage of photos to print them on a smaller scale to use on my layout. This tip works perfectly for printing small photos just small enough to fit within the frames.

I layered the frames side by side then used a few die cuts, acrylic and stickers to decorate the frames.

Since I ran out of space to actually hand-journal on this layout, I used the sticker words to help share my story!

Thanks for visiting today!

-Nicole


Leave a comment

Study Hall: Enjoy

Hello, friends! Maryám here to share with you a closer look of the layout I made for the challenge of this month. If you didn’t see it, the challenge for this month is all about highlighting fun ways to use the plaid washi tape that came in this month’s kit. We also have an optional sketch created by Kristine Davidson. Check out all the details about the challenge here.

 When I got my kit I had no idea of how to use the washi tape but after some hours thinking I decided to put it on a white cardstock and punch some circles and then cut it in half to create some cute garlands for my page. I really liked the result I got.

Here is my final page:

Here are some close-ups:

I hope you liked my page and I can not wait to see what you will create with the washi tape of this month. Don’t forget to join our facebook group to participate in our challenge.

Thanks so much for stopping by today!

Have a wonderful day.


3 Comments

Study Hall: Simple Card

Hi friends,

Melissa here with you again and I’m sharing my third, out of four, project using the gorgeous September Sundance kit! I hope you are enjoying this kit as much as I did and are creating lots and lots! How can you not with such beautiful product and amazing inspiration from our team? Yay!

Today I’m sharing a relatively easy card to make. I just had fun with this one. No fancy design notes. No frills or extras. I just took it back to basics with this card and had fun. I went to a design that I’ve used many times on my cards… because I love it… and because it’s such a versatile one to boot. Essentially, I create half of the card with patterned paper, a diagonal slope, and minimal embellishing.

Here it is with a few close-ups:

melissae_cksept17_daughter1

Those florals are so easy to use! I also threw in some of the washi tape from the 1 Canoe 2 collection. While these papers are from the Fancy Pants collection, I wanted to show well all of these collections and kit items go together. Love it!

melissae_cksept17_daughter2

I did use a few things from my stash. The gold enamel dots are from my stash and I used two stamps that were from past kits or sponsors. You can also find them in the store… I used a set from Latina Crafter and Honey Bee Stamps. They are no longer in the shop but, you can go check out the individual manufacturers to see all the wonderful product they have!

melissae_cksept17_daughter3

How fun is that acrylic heart? They are included in the kit and so perfect for that finishing touch!

Thanks for joining me today! Until next time…


2 Comments

Field Notes: A first look at my September TN

ck-field-notes-traveler-notes-header

Hello Clique fans! It’s Enza, and today I’m here to share a couple of spreads in my Travelers Notebook featuring the gorgeous Sundance Main Kit.
CK_Sep17_MainKit-24
Fall season is upon us and this kit is perfect to document it. Since the month has just started, the first thing I want to share is how I embellished the opening pages of my insert.
egudor_September3_FieldNotes
The patterned paper on the left-hand side is part of my cover. I made my own inserts a while ago and this just happened to match the colors in the kit perfectly. I used one of the exclusive Fall words cut files for the month, which I cut out of white card stock and tinted with a mini ink blending tool and Distress Inks from my stash.
ck-sep17-kitcuts-web2_origI placed it vertically along the left side of the page and added the word “memories” from the Freckled Fawn Puffy Alpha Stickers below it. I kept the embellishments to a minimum, just a few 1Canoe2 ephemera pieces and enamel dots.
egudor_September3_FieldNotes_CloseUp5
For the right side, I mainly used the exclusive printables that come with the kit this month. They are so gorgeous! Love them all!
egudor_September3_FieldNotes_CloseUp3
egudor_September3_FieldNotes_CloseUp4
I also created my first spread for this month.
egudor_September3_FieldNotes2
I used some of the Fancy Pants Dream Big patterned papers to cover both pages and adhered two strips of a different color along the spine to create some separation. The cut file peeking out of the photo is one of the older Clique Cuts that can be found in the digital store.
egudor_September3_FieldNotes_CloseUp1
A few stickers, die cuts and the Fancy Pants Puffy Sticker sentiment finished one side of the spread, while my journaling, which I typed and cut into strips, completed the other side.
egudor_September3_FieldNotes_CloseUp2
Thank you for stopping by today. I hope you felt inspired to use the Sundance Kit for your September memories.
Have a lovely day!
Enza


3 Comments

Geek Lab: Dream Big Card

CK - Geek Lab - header

Hey friends,

Melissa here with you today and I’m sharing one of my four projects created using the absolutely stunning September Sundance kit. Seriously, it is so beautiful. I just love the two collections from 1 Canoe 2 and Fancy Pants. So Fall but, a slightly different color palette than the usual oranges and browns. Love!

Alright, so, on to my project. Today I wanted to share with you a fun card using one of the cut files from the CK Store. I love using cut files and I know there are so many posts and tutorials on using them but, it never hurts to see one more. Right? Plus, it also doesn’t hurt to remind you we have some awesome cut files here in the shop! Designed exclusively for you by some top notch ladies, too, and they go so well with the kits and product! Yay!

Alright, here is the cut file already cut out and ready to go…

20170812_223134

To get my papers ready, I kept the “negative” pieces of the cut file and used them as a template. That way, I knew I would get slightly bigger to the true size. This helps immensely when getting ready to place them in between those spaces of white cardstock. I know they fit and will go over slightly so I can use some adhesive too. I found it easier to adhere the patterned paper strips to the card first. Especially for this particular cut file since there were some super thin pieces. It’s hard to line it up right and get it down perfect.

20170812_223326

Because of the thin lines of cardstock, I used glossy accents as my liquid adhesive. It dries clear and I don’t mind the slight shiny parts that show. After adhering the cut file on to the cardstock, I didn’t like how the basket part of the hot air balloon looked as just white. It was too late, and too annoying, to try to cut out from cardstock something so, I dug out my Gelatos. Next time… I will remember to cut out “just in case” OR color with the ink FIRST. It got a little sketchy a few times and almost smeared on my card base. But, in the end, I don’t mind the way it looks.

20170812_223815

The puffy sticker words from Fancy Pants are just perfect for cards! Almost all of the sentiments are PERFECT and I thought this one would go so well with the hot air balloon.

melissae_cksept17_dreambig1

The card really didn’t need much else! Just a of the die cuts from the kit and ta da! Easy and so fun and whimsical.

Thanks for joining me today for Geek Lab! I hope you get a chance to grab some of the awesome cut files in our shop and use them to help stretch your kit! Make sure to use code melissa10 at check out to save 10% on your order!

Until next time…

ck_dt17-headshots-melissa


2 Comments

Art Studio: Right Now

Hi everyone. I am so excited to share my first layout using the fabulous Jellybean Kit. The colors in this month’s kit is so vibrant and pretty; I love it. Before I started embellishing this layout, I sprayed yellow and blue spray mists by Shimmerz Paints on to white cardstock. I used a paper towel to dab the excess ink off the paper so it wouldn’t bulk up. Then I used a honeycomb stencil and ink to create a fun border across the middle of the layout in pink and orange. I used yellow and blue paint to alter the wood veneer. I wanted this layout  to be as colorful as possible.

I purchased the Add-On paints and puffy stickers from the April Shop. I am so glad I bought them because I am loving how smooth the Shimmerz Paints are and the puffy stickers are absolutely beautiful… you have to see them in person. They also feel like they are made from nice quality material.

I paired up a heart die cut with a heart puffy sticker to make the heart more interesting. I love adding layers to embellishments. And here is my layout. Our design team Maryam Perez created the journaling cards that I used on this layout. I love them all.

Thanks for visiting today. I hope I was able to inspire you to use mist and some acrylic paints on your next projects! It’s so much fun and once you get started, it’s not as scary as you might have thought. 🙂

-Nicole


4 Comments

Guest Contributor – Tiffany Keronen

student of the month
Hey everyone, Tiffani here with another layout made with the Hello Sugar January Kit.
ck_jan17_kit
Mixed media supplies are by far my favorite to work with. You have so many options on creating backgrounds and your own personal touches. For this layout I started with white watercolor paper. I prepped my page with gesso and then once that dried I used Tim Holtz Distress Crayons. To blend I used water and my fingers. On top of that I decided to do a brick wall using Rangers Texture Paste.
20170114_081502
I love all the papers in this months kit. These are 3 of my favorite patterns. I love the torn paper look so I added that to one of the edges of each paper. The pictures I chose for this layout are of my 2 closest friends. They have been there for me through some of the hardest moments in my past year.
20170114_081550
I adore all of the embellishments in this months kit. The vinyl stickers and thickers work so well together. I added some twine to the little xoxo tag and added 3 hearts to signify each one of ours.
20170114_08153720170114_081720
Thank you for checking out my layout and happy creating.  You can find the January Hey Sugar kit in the Clique Kits shop HERE!  Save 10% off the kit by using the code SAVE10 at checkout!  Have a great weekend and if you are not yet part of The Clique on Facebook you can check it out HERE!
ck_coordt_headshots-1617_v-copy-18
Tiffani


6 Comments

Locker Room: Simple Layout with Flowers

Blog Image_Locker Room

Hello! Happy Friday, how are y’all? Caroli here and today I want to show you step by step how I made this simple and quick layout using January kit Hey Sugar. don’t you just love all the color on it? 🙂


I started my layout by throwing some splatters of black mist on a sheet of white cardstock I got from Clique Kits Shop.

cliquekits_heysugarkit_lockersroom_carolischulz1


Then, I used as background this flowery grid designed by a good friend of Clique Kits, Nicole Nowosand owner of Just Nick Studio. I cut the grid on my Silhouette Cameo and filled just some of the flowers using patterned papers included on the kit.

cliquekits_heysugarkit_lockersroom_carolischulz2


Next, I placed my photos and adhered them using some foam dost, this way my layout gains volume and looks more fun too.

cliquekits_heysugarkit_lockersroom_carolischulz3


Now it’s time to use some embellishments! I love this flower paper by Crate included on the kit, the colors and beautiful watercolored flowers are just perfect. I fussy cut some flowers and used them to mebellish my page.

cliquekits_heysugarkit_lockersroom_carolischulz4


Agin I used some foam dots to adhere the flowers, I love my pages to have a lot of volume so foam dots are my best friends!

cliquekits_heysugarkit_lockersroom_carolischulz5


These puffy stickers by Fancy Pants are so pretty! Love specially the font of the words, so I used word “amazing” for creating my title.

cliquekits_heysugarkit_lockersroom_carolischulz6


I complemented my title with the Thickers included also on the Kit. I really love these Thickers, the shade effect on them is pretty and since they are black & white they combine perfectly with any other color. My title is finished, and I also added some more puffy shapes from Fancy Pants here and there, just to make my layout more colorful.

cliquekits_heysugarkit_lockersroom_carolischulz8


Finally I wrote my journaling and there you go, a super fast layout but still pretty and interesting. One thing I love how about working with CK kits is how easy is to create beautiful projects in minutes. All products are so well coordinated you just have let your creativity go.

cliquekits_heysugarkit_lockersroom_carolischulz7

Hope you have a great weekend! XO – Caroli


5 Comments

Study Hall: Amazing 2016

@amytangerine @echopark @stampinup @cliquekits @spiegelmomscraps @jodyspiegelhoff, #cliquekits #studyhall #tailormade #amytangerine #projectlife #layout #cktailormade #sequin #creativeagenda #card #enamelstickers #stampinup

Hello Clique Friends!

Melissa here with you today and I’m sharing a page that is highlighting my Top 10 moments of 2016. I’m using the gorgeous January kit… oh my lands I love this kit!

So, before I show you the page, I just have to say I really enjoyed the whole process of making this page. I found that going through my Instagram feed was the best way to remember all the fabulous memories of 2016. For me, it was a great year! Full of blessings. Full of new adventures. Full of amazing friends and opportunities. Every year has it’s hardships but, the blessings outweighed those and I’m so thankful!

Truth be told, I had a very difficult time narrowing it down to 10 things but, that seems to be the magic number. And I feel like any more and it would just crowd the page. Once I finally decided on the 10 moments, I printed out my photos super small. I wanted to create a partial collage with lots of journaling. So, here is the finished product…

amazing2016layout

I kind of like the “authentic scrapbook page” feel of this. What I mean by that is, after glancing through the old scrapbooks my grandmother kept, everything was usually just placed together in a collage type manner. Sometimes little memorabilia was tucked behind photos and such. While I didn’t add that, I did use the embellishments from the kit to help add texture, color and interest to the layout. I just really love the look of a collage. All my memories connected and placed together.

amazing2016b

I had to think of a way to add a title. My pages always need a title. And since I had a vision to place my journaling all on the right side, I thought of doing something sideways to visually split the design areas up. Those title words from Fancy Pants work perfect! Add in the thickers to create the year and, it’s perfect!

amazing2016c

When I make layouts, I love to journal. I like to talk so, it would make sense I’d have a lot to say on a written page, as well. Ha! I decided to get a little fancy (not really) with my journaling by sometimes printing and sometimes writing in cursive or my half print/half cursive type handwriting. That was one of my favorite things to see in my Grandma’s scrapbook – her handwriting.

Here is a little collage with a few more close-ups of my page:


Thank you so much for joining me today!

Grab your January Hey Sugar kit HERE. I hope you find time to document all your favorite memories from 2016!

melissa-elsner


8 Comments

Yearbook: Highlights of 2016 in one Layout

yearbook


Hello there, how are you? Happy New Year Everyone! Caroli here and today I want to share with you this layout that basically summarizes how 2016 was for me.

I must say that  it was such an awesome year!I was blessed with too many good things and I got to learn from the bad ones, I only can be thankful for this year, so I wanted to document my happiness in a layout.

I used the beautiful January Kit HEY SUGAR, which features the awesome product from Crate Paper, Simple Stories and Fancy Pants. This kit is already available for single purchase in the Clique Kits shop here, so if you are thinking about getting it, go hurry before it’s all sold out!

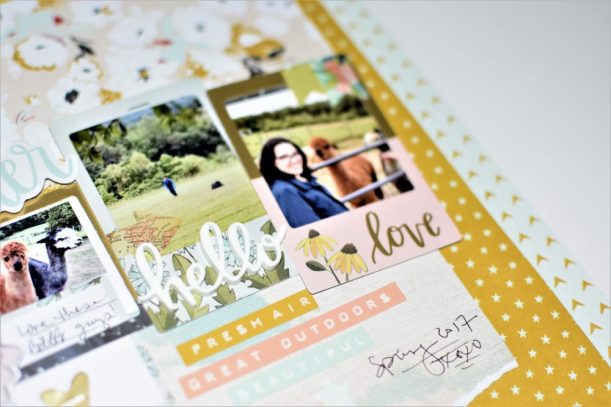
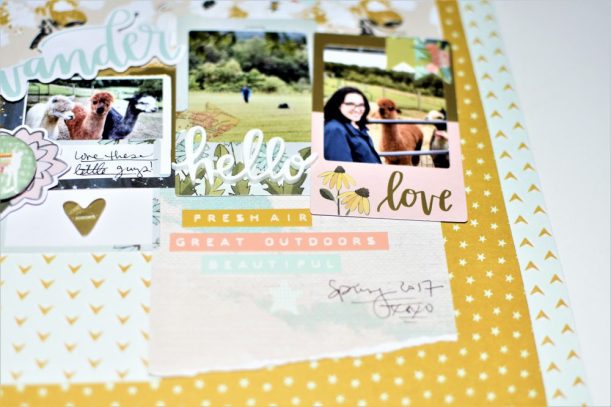
Of course for this projects I used a lot of photos, each one representing something I loved during 2016: being pregnant, the birth of my baby boy, my little girl turning 8 with the greatest party I’ve thrown so far, spending a lot of time the 4 of us at home during winter (my husband was on medical leave and I was on maternity leave, so it was almost like vacations, LOL!), a flawless return to work after almost a year of maternity leave, and being chosen by 2 of my favorite manufacturers for being part of their DT.

Of course there were bad moments and sad times, but I chose to learn from them and just let them go, always looking on the full glass 🙂

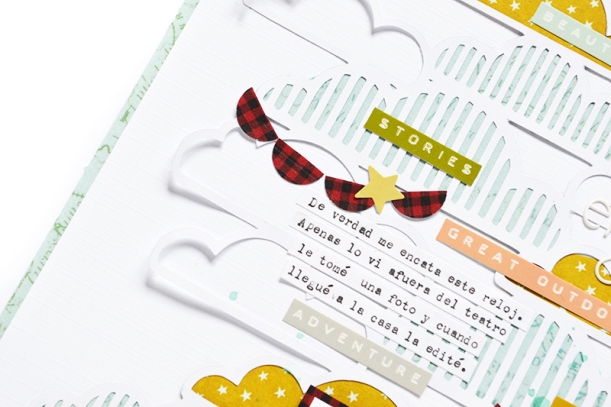
I decided to cut the numbers 2016 and fill the negative space with the beautiful golf foil vellum included on the kit. Also, I filled number zero with a circle grid and paper circles.

cliquekits_yearbook_januarykit_heysugar_carolischulz


The gorgeous flower paper by Crate Paper included on the kit was asking to be fussy cut, and so I did. I used some of the flowers to decorate.

cliquekits_yearbook_januarykit_heysugar_carolischulz2


Since there were a lot of pics, I barely decorated this page; I used few enamel dots and some puffy hearts by Fancy Pants, love the Joy Parade embellishments ❤

cliquekits_yearbook_januarykit_heysugar_carolischulz3


The black Thickers included on the kit made the perfect contrast for all the color in this layout. I love the shade effect of these ones!

cliquekits_yearbook_januarykit_heysugar_carolischulz4


I hope you like the idea and concept behind this layout ans try to document your 2016 too. I love using a lot of pics on a single project and think that combining circles and regular photos is such a great way to give variety to the composition, don’t you think?

Have a great day!
XOXO – Caroli