Hello, friends! Maryám here to share with you a closer look of the layout I made for the challenge of this month. If you didn’t see it, the challenge for this month is all about highlighting fun ways to use the plaid washi tape that came in this month’s kit. We also have an optional sketch created by Kristine Davidson. Check out all the details about the challenge here.
When I got my kit I had no idea of how to use the washi tape but after some hours thinking I decided to put it on a white cardstock and punch some circles and then cut it in half to create some cute garlands for my page. I really liked the result I got.
Here is my final page:
Here are some close-ups:
I hope you liked my page and I can not wait to see what you will create with the washi tape of this month. Don’t forget to join our facebook group to participate in our challenge.
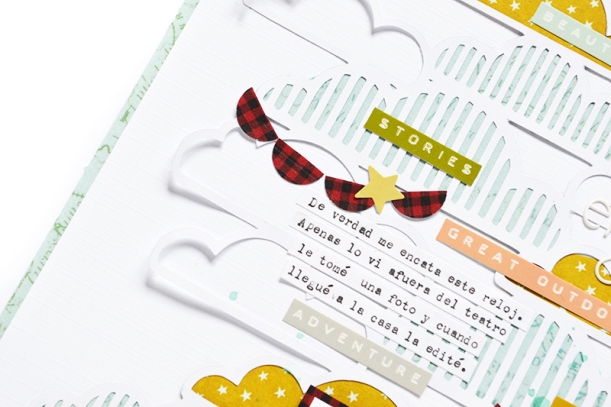
Melissa here with you again and I’m sharing my third, out of four, project using the gorgeous September Sundance kit! I hope you are enjoying this kit as much as I did and are creating lots and lots! How can you not with such beautiful product and amazing inspiration from our team? Yay!
Today I’m sharing a relatively easy card to make. I just had fun with this one. No fancy design notes. No frills or extras. I just took it back to basics with this card and had fun. I went to a design that I’ve used many times on my cards… because I love it… and because it’s such a versatile one to boot. Essentially, I create half of the card with patterned paper, a diagonal slope, and minimal embellishing.
Here it is with a few close-ups:
Those florals are so easy to use! I also threw in some of the washi tape from the 1 Canoe 2 collection. While these papers are from the Fancy Pants collection, I wanted to show well all of these collections and kit items go together. Love it!
I did use a few things from my stash. The gold enamel dots are from my stash and I used two stamps that were from past kits or sponsors. You can also find them in the store… I used a set from Latina Crafter and Honey Bee Stamps. They are no longer in the shop but, you can go check out the individual manufacturers to see all the wonderful product they have!
How fun is that acrylic heart? They are included in the kit and so perfect for that finishing touch!
I am back today with a new project using the beautiful MALIBU TN kit, what can I say, the Pink Paislee’s Summer Lights collection is gorgeous, and all the add ons are perfect to document summer, and those special beach adventures.
I love this kit, and it is ideal to document some of the pictures from our beach adventures down in Ecuador. Here is a small video on how this page came together, so sit down and enjoy!:
The starting point for this layout were the exclusive cut files from last year’s summer and August kits. Once I had cut them on white cardstock, i wanted to add color to the page, something very summery and bright.
Using a combination of heavy acrylic paint, i dragged the paint across white cardstock, and soften the look of the streaks with a large brush, and a baby wipe. Then stitched the page to one of the Elle’s Studio papers from last month’s POOL PARTY KIT.
The ring cut out also was sewn to the page, and then i used the Pink Paislee papers from the Malibu TN kit to back the flower cut out. I love the rich colors in the papers, and how they contrast beautifully against the bright background.
The flowers were then attached to the background using a bit of foam adhesive. I positioned them so that they were framed by the long leaves from the ring cut out.
The picture of my daughter admiring the sunset over the Pacific Ocean fit into this page seamlessly. A few of the embellishments from the kit, and the sticker sheet available at the Clique Store create the cluster on the page. After a few sprinkles of gold ink, the page was completed:
I love this page, the colors of the papers in the Malibu TN kit matched the bright green color of the background, and bring the eye to the subject of the page. It was so easy to complete the page using the kit, and a few of the exclusive cut files available at the Digital Store. There is a lot of goodies available at the store, so take some time to visit it to check them all out.
Remember to contact me, if you have a question about how this page came together.
Nathalie here with you today. I hope you all are doing well!
Here in Canada we are enjoying our Summer season, and that means travelling. This year we headed back to my native Ecuador for a month long vacation, and brought back over 5000 pictures to live by until our next trip. I was lucky to come back to find the gorgeous Malibu Traveler’s Notebook kit at my door step! Right away, the colors of the papers in the kit, and all the add ons were an open canvas to start documenting some of our vacation adventures.
This month’s TN kit is loaded with many so many goodies that can easily also be reworked into a scrapbook layout. Here is small video showcasing how the layout came together:
As you can see, the kits are versatile!. In this case I used the Malibu TN kit to create this colorful, and vibrant page about our vacation resort. It all started with the cut file (which i had previously designed), which you can easily download below -just click on the picture-.
All the letter spaces were backed with the different 6×6 papers included in the Malibu TN kit, except the letter “o” which was backed with the subject’s picture. After all the letters were secured, then i used some foam tape to add a bit of dimension to the page.
To add more color to the layout, I used some Prima’s The tropicals watercolor palette to create a mixed media background. The colors used match those of the papers in the Malibu kit.
To bring the eye to the picture of the layout, a few clusters were created around the “o”. The clear stickers from the Pink Paislee’s Summer Lights can easily be backed with white cardstock, so that they stand out on the colorful papers.
To complete the visual triangle on this page, i used a combination of all the Malibu kit’s embellishments. The exclusive printables (the escape sign) along with the fussy cut heart, die cut pieces and the holographic star bring the page together. Here is a look at the completed layout:
I am loving the final look of this page (even after a 6 week scrapbook free vacation)! All the colors in the background complement those of the Malibu TN kit, and bring the picture to life. Not to mention that those Neon pens included in the kit are so smooth, and they even work on top of mixed media!!! If you haven’t checked the kit yet, then visit the Clique Kits Store to see all that is included; there are still a few TN subscriptions available!!
Remember I am always a comment away if you have questions about how this page came together. In addition, I would love to see what you create with the cut file, so don’t forget to tag me if you use it in one of your projects.
Melissa here with you today and I’m sharing a card using the June Aquarelle Kit. For this card, I wanted to highlight the awesome Shimmerz Dazzlers you can get as an add-on from the shop. This stuff is so much fun! It’s, essentially, modeling paste that already has the color and lovely sheen to it.
I googled some ideas on how to use it. I loved what I found and definitely wanted to translate it to the smaller scale of a card. Here is the full photo:
I just love how the Dazzlers give this card a little “oomph” for the background.
What I did was super simple – I used a mask that I had in my stash and smoothed the dazzlers over it with a palette knife. I was careful to not leave it took think but still have enough dimension. I also love the messy look in which it seems as if I scraped off some of the Dazzlers off.
It didn’t take long to dry so, I was able to complete this card rather quickly. At least, quickly when I think of how long modeling paste can normally take to dry!
While it was drying, I begin to layer the top part of my card. I used bits and pieces from the patterned paper, the vellum and die cuts. I even broke out the sewing machine and added a little bit of stitching.
Easy peasy lemon squeezy!
I hope you enjoyed this card today. And, I hope you get a chance to go dig around in the shop for add-ons. While June is winding down, I know many of you are just now digging in to those June kits. Don’t forget to use up the scraps to make a few fun cards, too!
I’ll be back next week with another card and the fabulous Dazzlers!!!
Hope you all are getting lots of inspiration from all the beautiful projects created with the beautiful Aquarelle Kit. This month’s kit is gorgeous, and it features the beautiful “Wild at Heart” collection from Cocoa Vanilla Studio. You want to get your hands on this kit!
I was drawn to all the watercolor floral designs from the collection, and knew that i would be fussy cutting a large number of them for one of my projects. For this layout, I chose to document one of the many pictures of our Mother’s Day weekend by creating a large shaker element, and framing it with flowers and exclusive printables from this month’s Aquarelle main kit. So sit down, and enjoy the video on how this layout came together:
I chose a large picture with lots of negative space for this layout. First I created a shaker element, by stitching together a circle of light pink/coral cardstock, a same size vellum circle, and the outline of the circle (made of white cardstock) together. Before closing the shaker element, a bit of the Sorbet Kit sequin mix was added to the inside of the pocket, especially the large flowers in the sequin mix.
The Cocoa Vanilla Studio’s “Artisan” paper serves as the base for this layout. A little bit of white acrylic paint behind the shaker element helps bring out the colors in the sequin and the flowers that frame the picture.
To frame the picture, and the shaker element, floral designs were cut from the “Patchwork”, “Luscious”, “Memento” papers (all included in the main Aquarelle Kit), and then glued behind the pocket circle and the large picture.
I took advantage of the many exclusive printables included in the Aquarelle kit, as well as the “Fussy Cuts” page to add small clusters around the picture.
The Pinkfresh Studio Alphas included in the Aquarelle kit are so easy to incorporate to all types of projects. Since there is a large white space in the picture, the title was glued straight on the picture right at the larger floral cluster. A small fussy cut butterfly from the “Mariposa” paper completes the title. After adding the journal lines, a few gold ink splatters complete this project. Here is the final layout:
Don’t you just love all the colorful florals in this month’s Aquarelle kit? Oh, I am in love with this kit ( and I think, tears were shed when I fussy cut the papers, they are just too beautiful!!). Remember there is only a few kits left for sale at the Clique Store, so run to the store to get one of the kits.
I am always a comment away if you have questions on how this came together.
Hello Clique Kits lovers! Evi here, and I have a very floral planner spread using the Wild at Heart collection from Cocoa Vanilla in the June 2017 kit. I love the rich navy colors mixed with the pinks, magenta, mints and corals in the collection.
I used the cut apart sheet for cutting out the perfect sized rectangle needed to fill the entire space in my MAMBI inserts. My inserts are from my HAPPY planner 365 but I dislike the disc system and punch holes to put in into my Carpe Diem binder from Simple Stories.
The ephemera die cut pack comes in the kit and I picked out all the lovely florals to add the details to my spread. I wanted to make sure I featured all the rich colors in this collection on this spread.
The butterflies are also a nice detail in this collection. I wanted to incorporate the small positive affirmation pieces too. ‘Dream Big’, ‘This makes me Happy’, and ‘Memories’ add nice text to the layout.
I added in a few details to my week ahead of time with a pink, blue and aqua colored ink pens. The rest of the space will be added as the week goes on. I hope you are inspired by my layout and try a version of your own.
I hope you all have been enjoying all the beautiful projects the DT has created this month with the beautiful “Jellybean” kit. It does not only contain beautiful papers and embellishments, but also exclusive printables and beautiful cut files!
For this layout, I wanted to use the large phrase title cut file as the main focus in the page, so I chose to convert it into a large stand out title. Here are the picture steps I followed on the Silhouette Software to create this title:
Here is the image ready to be cut. DO NOT close the program or image after cutting it!
Using the offset command, add an external offset to this image ( i have colored the original image, so you can see how the function works). You can chose the size of the offset.
Separate the images, just click on the edges of the original image, and move it out of the picture. Now the offset is ready to be cut.
To make the title stand out, i added a small white border around the title (the offset). The title was cut from the beautiful Bella Bld.’s “Magnifique” paper -though the flowers are gorgeous, I was drawn to the colors and paint brush marks on the image-. I made sure to cut the title from the center of the Magnifique page.
Once the cuts were glued together, the edge of the title was pierced to add some stitching and texture to it. After adding hand stitching to the title, I set out to construct the page. First, i trimmed about 0.5in from two of the edges of a light pink card stock. Then I used watercolors and inks to add some color to the background.
Once the background dried, the title was attached to the page, making sure it sit right in the middle of the large watercolor background. The picture of my niece holding her art TN (she loves TNs as much as I do!) was placed above the title. I used the exclusive printables, and ephemera included in the Jellybean kit, as well as the puffy stickers from the Make Your Mark collection that are available in the Clique store, to frame the picture.
To finish the page, using the sewing machine, I stitched the layout to the left over piece of the “Magnifique” paper, making sure to leave two opposite corners free . These were folded into the layout to be used as part of the clusters formed here. I tried to use these corners to bring some of the colorful accents and embellishments from the Jellybean kit. Here is the final layout:
Don’t the colors and title work just pop out of this page? Though I love the roses, I wanted to take a different approach when using the Make Your Mark “Magnifique” from the Jellybean kit in this layout. I am so pleased with the end result, and i hope it inspires you to create stand out titles for your project.
Don’t forget to check Clique Kits to register for a subscription (there are just some spots available) for their gorgeous kits, or sign up for their newer Traveler’s Notebook kit. You will love them!
I am always a comment away if you have any questions on how this came together.
What do you do when you have a piece of patterned paper and you love BOTH sides of it? Well all I did was fold a corner over and was able to create an interesting design AND see both prints at the same time!
I like that the colors on this paper were boyish, and I thought that the blue polka dots would be a good contrast to the bright and colorful “watercolor” side of the paper. I initially had the fold on the bottom and the photos on the patterned paper, but thought that the photos stood out better on their own in the corner on the white background. (I also love that the colors in my photo go so well with the colors in the prints!)
For my embellishments, I also stuck with the same color palette and used some of the 3×4 cut aparts, the die cuts, and even pieces of this month’s exclusive printable.
And the gold foiled elements add the perfect sheen to the page, too!
You can watch how I created this page from start to finish here:
Hello Clique Fans! Erica here with you today to share a layout I created using the fabulous March 2017 kit PLAY featuring the Little by Little collection from Shimelle!
Now if you are on Instagram you may follow the IG user SCRAPPYLIKEAFOX …if not you really should! Well she has post about this Yippe Strippy challenge and has a ton of inspiration on her IG! I was very inspired by these projects and decided to cut up some strips of my own and create a fun layout using the March kit! I just love the way the layout turned out and this is a great way to use up little strips of scraps!!
I started by cutting strips that I had left over from creating some project life cards! I cut them in a couple different widths and then began to adhere to my white cardstock! Oh wait! First I had to add some great color splats to match my papers! I used a yellow, pink and teal from my stash!
The photo is of our Red Nose Pitbull Lola! She is the sweetest little thing and my heart breaks when I hear so much bad rap for Pitbulls. I have met so many wonderful sweet and loving Pitbulls and they just have such a bad reputation. It is all in how you raise a dog is how I feel and I stand up for our pittie and other pittes! We have turned a lot of people who had bad thoughts of them into pittie lovers! I could go on forever but lets get back into the layout!! I pulled out some of the awesome add on products I picked up in the Clique Kits shop and started to embellish my layout! I love the Shimelle wood buttons and enamel dots!! I scattered them around the strips of paper along the side of my layout.
I also added one of the Oh My Heart charms that was included in the kit! My title is Red Nose Lola and I used the playful and colorful alpha that was also included in the March kit! I love all the fun colors and polka dots in this alpha set! I also ran my layout through my sewing machine to add some fun texture to the paper strips! I love all the little strings everyone! I finished my layout off with some black ink spatters and my journaling at the bottom of the page using the WRMK Typeset Typewriter! I just love that thing so much!
Here is a look at my final layout!! I hope you enjoy it as much as I do and I hope to see you give this Yippe Strippy challenge a shot!! Clique Kits subscribers have started to get their kits in the mail! We look forward to seeing what you create with your kits! Remember Clique Kits has a monthly blog challenge going on you can check out HERE! You can link up for a chance to win a fabulous prize from The Cut Shoppe!
Thanks so much for stopping by today! If you are interested in the March 2017 kit you can grab one HERE in the Clique Kits shop! These kits are going fast so grab one today before they are gone! Have a great weekend everyone!


 I added in a few details to my week ahead of time with a pink, blue and aqua colored ink pens. The rest of the space will be added as the week goes on. I hope you are inspired by my layout and try a version of your own.


