Clique Kits

Click. Connect. Create.


Leave a comment

Geek Lab: Adventure Card

Hi friends,

Melissa here with you today and it’s a bittersweet post! This is my last one… not just for this current kit but also for my term as a design team member. I have absolutely loved my time here with Clique Kits but, I had to make the decision. I love designing and teaching and empowering other creative types but, it’s time to take a break from DT’s and focus on me and what I want to do. I’m looking forward to no deadlines and such. But, I will say, this team will be one I will miss. I hope you know that Clique Kits has a GREAT things here. Beautiful kits (will always be my favorite), amazing inspiration (I’m excited to see what the next team does) and a fun community (have you joined us on Facebook yet?)

For my last card with you all, I wanted to, once again, show you a card using the gorgeous cut files that are exclusive to the CK kits. I loved the fall leaves square but, was more drawn to the individual leaves. In my head, I pictured utilizing the circle stickers and then embellishing with the leaves. It turned out better than I even thought. I hope you like it too. Here is the finished card a few close ups:

melissae_cksept17_adventure1

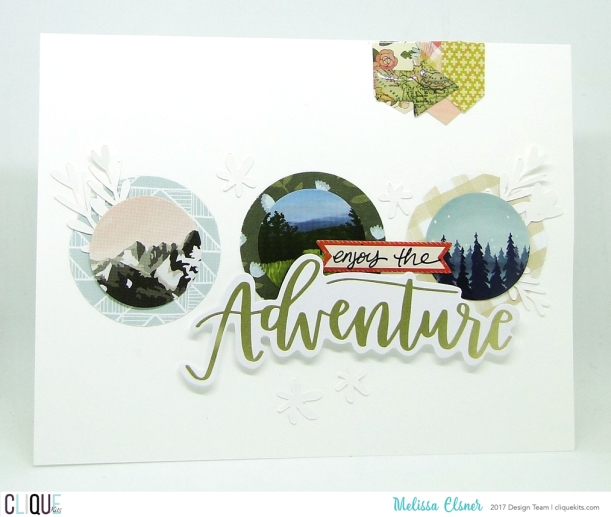
I also used the little asterisk shaped cut files that were part of that square. I actually like the texture they bring with the tone on tone of the white cardstock. I was equally excited when I realized you can see them in the photo too!

melissae_cksept17_adventure2

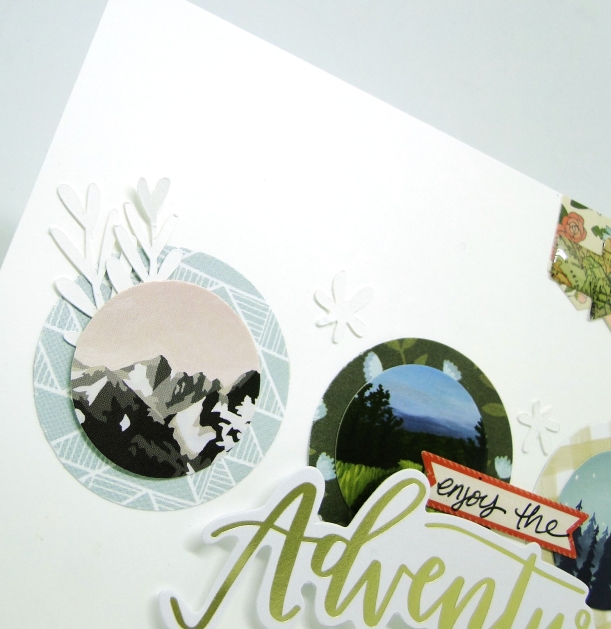
How cute do those leaves look??? They really add the perfect amount of texture and help the card have a bit of interest. Those stickers are fabulous but, when in a pinch for that “one more thing”, cut files are the best!

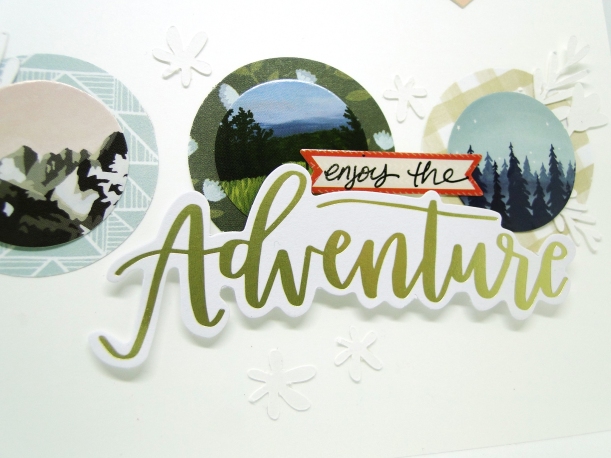
I decided to hand write the first part of the sentiment on to one of the stickers. I just could not find the right alpha in my stash or anywhere else so, handwriting it is. Thankfully, I do like my handwriting!

melissae_cksept17_adventure3

Thanks for joining me here today!

The past year has definitely been an adventure I have enjoyed and I’m also looking forward to moving on! See you around!

ck_dt17-headshots-melissa


3 Comments

Study Hall: Simple Card

Hi friends,

Melissa here with you again and I’m sharing my third, out of four, project using the gorgeous September Sundance kit! I hope you are enjoying this kit as much as I did and are creating lots and lots! How can you not with such beautiful product and amazing inspiration from our team? Yay!

Today I’m sharing a relatively easy card to make. I just had fun with this one. No fancy design notes. No frills or extras. I just took it back to basics with this card and had fun. I went to a design that I’ve used many times on my cards… because I love it… and because it’s such a versatile one to boot. Essentially, I create half of the card with patterned paper, a diagonal slope, and minimal embellishing.

Here it is with a few close-ups:

melissae_cksept17_daughter1

Those florals are so easy to use! I also threw in some of the washi tape from the 1 Canoe 2 collection. While these papers are from the Fancy Pants collection, I wanted to show well all of these collections and kit items go together. Love it!

melissae_cksept17_daughter2

I did use a few things from my stash. The gold enamel dots are from my stash and I used two stamps that were from past kits or sponsors. You can also find them in the store… I used a set from Latina Crafter and Honey Bee Stamps. They are no longer in the shop but, you can go check out the individual manufacturers to see all the wonderful product they have!

melissae_cksept17_daughter3

How fun is that acrylic heart? They are included in the kit and so perfect for that finishing touch!

Thanks for joining me today! Until next time…


4 Comments

Locker Room: Enjoy the Journey Card

Hi friends,

Melissa here with you again and I’m sharing the second, of four, projects I have made using the stunning September Sundance kit.

I love Locker Room posts! The title always reminds me of half time at a football game (totally appropriate right now since it’s football season GO HAWKS!) and the coach is getting every one fired up again… whether it’s because the team needs a kick in the toosh or maybe they are rocking it out and don’t want to lose steam. So… this type of post always has me wanting to give you a pep talk! Maybe you have no mojo… maybe you are going strong… whatever it is, I hope that I can just provide with a couple more tools for your creative toolbox and how to make the most of your kit!

Here we go!

20170812_192448

I know, I know. This looks like the makings of an Art Studio post but, it’s not. This piece of cardstock was a booboo. I messed up with my ink for another project. Almost threw it out but, noticed the colors went perfect with the papers in this kit. So, I added a few more splatters and decided to use it as my cardstock base. See? Even our “mess ups” end up useful! Don’t throw them out just yet!

20170812_220537

Alright, so this next part has a lot to share. One of the ways I love taking on a new perspective and/or stretching my product is to look at what I can fussy cut. The flowers and leaves were so perfect to do this with! It definitely helps to utilize every single part of the kit. I also wanted to incorporate one of the cut files. I love how cut files can add more to the projects and, the best part? You never run out! I’m also going to be using some of the stickers on this card and those fun alpha stickers.

20170812_220858

I want to point out something with this card, so far. When I use mists and inks on my cardbase, I notice that I use less product. Why? Because the inks provide a couple of things… texture and color. That way, I can bring in a little pop of something with the pattern papers and embellishments but, not too much. The result is my product/kit lasts longer! And I can make more! Which is exciting when I love the collection and papers and all that! Yay!

Here is the final card with the finished sentiment and embellishments…

20170812_221134


melissae_cksept17_journey1

Thanks for swinging by today! Head over to the shop to see more of the September Sundance kit, as well as, the ala carte shop for all the beautiful add-ons you can get! Use code melissa10 at checkout and save 10% on your order!

Until next time…

ck_dt17-headshots-melissa


3 Comments

Geek Lab: Dream Big Card

CK - Geek Lab - header

Hey friends,

Melissa here with you today and I’m sharing one of my four projects created using the absolutely stunning September Sundance kit. Seriously, it is so beautiful. I just love the two collections from 1 Canoe 2 and Fancy Pants. So Fall but, a slightly different color palette than the usual oranges and browns. Love!

Alright, so, on to my project. Today I wanted to share with you a fun card using one of the cut files from the CK Store. I love using cut files and I know there are so many posts and tutorials on using them but, it never hurts to see one more. Right? Plus, it also doesn’t hurt to remind you we have some awesome cut files here in the shop! Designed exclusively for you by some top notch ladies, too, and they go so well with the kits and product! Yay!

Alright, here is the cut file already cut out and ready to go…

20170812_223134

To get my papers ready, I kept the “negative” pieces of the cut file and used them as a template. That way, I knew I would get slightly bigger to the true size. This helps immensely when getting ready to place them in between those spaces of white cardstock. I know they fit and will go over slightly so I can use some adhesive too. I found it easier to adhere the patterned paper strips to the card first. Especially for this particular cut file since there were some super thin pieces. It’s hard to line it up right and get it down perfect.

20170812_223326

Because of the thin lines of cardstock, I used glossy accents as my liquid adhesive. It dries clear and I don’t mind the slight shiny parts that show. After adhering the cut file on to the cardstock, I didn’t like how the basket part of the hot air balloon looked as just white. It was too late, and too annoying, to try to cut out from cardstock something so, I dug out my Gelatos. Next time… I will remember to cut out “just in case” OR color with the ink FIRST. It got a little sketchy a few times and almost smeared on my card base. But, in the end, I don’t mind the way it looks.

20170812_223815

The puffy sticker words from Fancy Pants are just perfect for cards! Almost all of the sentiments are PERFECT and I thought this one would go so well with the hot air balloon.

melissae_cksept17_dreambig1

The card really didn’t need much else! Just a of the die cuts from the kit and ta da! Easy and so fun and whimsical.

Thanks for joining me today for Geek Lab! I hope you get a chance to grab some of the awesome cut files in our shop and use them to help stretch your kit! Make sure to use code melissa10 at check out to save 10% on your order!

Until next time…

ck_dt17-headshots-melissa


2 Comments

Art Studio: Back to Basics

CK - Art Studio header

Hey everyone!

Melissa here with you today and I’m sharing a clean and simple card using the July Travelers Notebook kit. It truly is a perfect kit to make some cards! Just the right amount of papers and embellishments that are designed for the smaller scale of a Traveler’s Notebook… so, naturally, it would be perfect for cards too!

TNKit

To go with this post, I also have a process video I’d love to invite you to watch.

Now, normally for these Art Studio posts, I’m always drawn to creating with paints and other “artsy” and messy supplies. Mixed media is always a go to. As I was contemplating what to do for this post, my “teacher hat” came on. I realized, YES… sharing our thoughts and ideas using all that product is awesome but, maybe we need to take it back to the basics and bit and talk about where we go for making sure our projects look pleasing to the eye (while still embracing our individual styles!).

Artists have their founding with the Elements and Principles of Design. Elements are the components and Principles are we organize them… put them in to action, if you will. So, for a little review, here are the Elements of Design: Line, Color, Shape, Form, Value, Space and Texture. Principles of Design are: Balance, Emphasis, Movement, Proportion, Rhythm, Unity and Variety.

Each of these terms are a little self explanatory but, if you’d like to go deeper with their definitions, you can check out this awesome resource at Oberlin.

Here is the card I created using the July TN Kit and contemplating how I use using the Elements and Principles of Design:

DSC03264

It’s a very clean and simple card. But, I thoughtfully used each kit item to create a well composed card. By using symmetrical balance, I utilized the colors and patterns of the papers to also create unity and variety. The flower is clearly the focal point. I also was able to draw attention to the lines and shape of the card design by bringing in rhythm and texture. Where does the emphasis lie? I believe on the flower but,  your eye also is taken on a brief journey to the sentiment and cute little heart up top.

For more thoughts, have a watch of my video below:

You can find the July Pool Party TN Kit here.

Use melissa10 as a discount code while you shop to save 10% on your order!

Here are a couple of close ups of that card so you can see all the lovely details:

DSC03268DSC03269

Thanks for joining me today!

ck_dt17-headshots-melissa


1 Comment

Locker Room: Use Those Scraps

CK- Locker Room - header

Hi friends,

Melissa here with you today with my last cards created using the beautiful June Aquarelle kit. This is a Locker Room post which, for me, dreams up half time. You know, it’s the Super Bowl and the teams are playing their game. Maybe one team just needs that extra pep talk to keep the energy flowing. That talk may contain some new inspiration that keeps the game fresh. So, that’s what we’re doing today. June is drawing to a close and the July kit is ready for you BUT, I know you still have some scraps and leftover embellies to use. So, let’s have a pep talk and I’ll give you some fresh ideas for how to use them all up on a card.

I am also sharing a process video with all the juicy details. Here are the two cards I’m sharing in the video…

Sparkle1

Hello1

Alright, to see all the ideas and tips on how I created these two cards, I want to invite you to check out the Cards with Melissa video below and happy creating!


ck_dt17-headshots-melissa


1 Comment

Study Hall: Let’s Get Dazzled!

@amytangerine @echopark @stampinup @cliquekits @spiegelmomscraps @jodyspiegelhoff, #cliquekits #studyhall #tailormade #amytangerine #projectlife #layout #cktailormade #sequin #creativeagenda #card #enamelstickers #stampinup

Hello friends!

Melissa here with you today and I’m sharing a card using the June Aquarelle Kit. For this card, I wanted to highlight the awesome Shimmerz Dazzlers you can get as an add-on from the shop. This stuff is so much fun! It’s, essentially, modeling paste that already has the color and lovely sheen to it.

I googled some ideas on how to use it. I loved what I found and definitely wanted to translate it to the smaller scale of a card. Here is the full photo:

SunshineSoul1

I just love how the Dazzlers give this card a little “oomph” for the background.

What I did was super simple – I used a mask that I had in my stash and smoothed the dazzlers over it with a palette knife. I was careful to not leave it took think but still have enough dimension. I also love the messy look in which it seems as if I scraped off some of the Dazzlers off.

SunshineSoul2

It didn’t take long to dry so, I was able to complete this card rather quickly. At least, quickly when I think of how long modeling paste can normally take to dry!

While it was drying, I begin to layer the top part of my card. I used bits and pieces from the patterned paper, the vellum and die cuts. I even broke out the sewing machine and added a little bit of stitching.

SunshineSoul3

Easy peasy lemon squeezy!

I hope you enjoyed this card today. And, I hope you get a chance to go dig around in the shop for add-ons. While June is winding down, I know many of you are just now digging in to those June kits. Don’t forget to use up the scraps to make a few fun cards, too!

I’ll be back next week with another card and the fabulous Dazzlers!!!

ck_dt17-headshots-melissa


2 Comments

Locker Room:

Hi friends,

Melissa with you here again and I’ve got another card to share with you, today, using the beautiful May Sorbet Kit! Today, I want to help you think “outside of the box” a bit. When I saw this sheet of lovely paper, from Pinkfresh Studio, in the kit – I knew I wanted to utilize it on a card. I could go the typical route and cut out a square, or two, to layer and create a sentiment. However, the more I thought about, the more I wanted to see how much I could pack on a card. A standard A2 (4 1/4″ x 5 1/2″) sized card.

So, I busted out the scissors and got snipping! And snipping! And snipping!

“This is very therapeutic”, I thought! And, I the design was beginning to take shape in my brain. I got pretty excited to showcase how to use all the little bits in your kit and to make it go farther!
Dare2Dream5

After I got it all snippy snipped, I arranged the pieces, just so, on my card base. That was fun too. Almost like a puzzle but, more fun. At least to me. I’m not a huge fan of puzzles. 😉

Dare2Dream6

Then, the next step came. How can I dress this card up more and keep using up all the awesome items in this kit??? We have those awesome buttons and all the gorgeous ephemera. Oh… this could get fun! So, I stuck and I layered and put.

Here is the final product:

Dare2Dream1

Yeah??? How fun is that?

I managed to include just about every color and imagery from this collection. Which, I was really happy about because I really love all the designs with this paper collection. It’s so pretty and light with a nice mod twist to it.

Here are a few close ups to show the layers and dimension:

So fun! This kit is SO fun! And I just know you are going to create and create and create with it. Don’t have one yet? Well, allow me to send you to the right place to get your own May Sorbet Kit! <—just click on that link.

And, I do hope that you enjoyed my post today! Happy creating!

ck_dt17-headshots-melissa


2 Comments

Art Studio: Let’s Get Misty

Art Studio

Hello friends,

Melissa here with you today and I’ve got a fun post for Art Studio. Of course, it involves inking and such and I’m also using the awesome specialty papers from Kaisercraft that are in the May Sorbet kit. (Psst… this kit is so beautiful and packed full of awesome product. RUN to store and get it!)

For this post, I wanted to showcase the Wildflower Spot Varnish Floral paper. I cut it down to 4 1/4″ x 5 1/2″ size and selected two sheets. Mostly, because I do enjoy making a couple of cards at once and, because I wanted to just give you a couple of ideas on how to use these papers.

First, I grabbed my favorite mists which are the Heidi Swapp Color Shine mists. Love the colors! I also am throwing in some gold mist from Jen Hadfield.

ArtStudio2

Instead of spraying it on the cards, I used a paintbrush to spread it on. Then, I did a little mist with the gold.

ArtStudio1

Easy peasy lemon squeezy.

Then, it was time to dive into the kit and use up the beautiful papers to create some cards. For the first card, I wanted to use the awesome washi tape strips from Pretty Little Studio. I thought to wrap them in a diagonal across the bottom half of the card. They were longer and it was easy just to wrap them all the way around since I would be adhering the floral paper down to my card base.

After that, I added all the goodies to complete my card and, here is the final look for this first one:

AmazingThings1

I love how you can still see the pretty floral paper through the tape. So cool!

Alright, now on to the second card!

HappyDay4

For this one, I wanted to combine some of the papers and show that, because they contain so much white space and calmness, they are perfect to combine on a card. No overwhelming colors and patterns. It really does end up being a breath of fresh air!

Here is the final look after everything was placed just so and a cute little cluster of embellishments was added:

HappyDay1

Isn’t that all sorts of happy??? I really wanted to use the Thickers on this card and, sometimes that gets hard with the smaller scale of the card. However, due to the beautiful, calm nature of the papers, I love how the gold just pops off and shines! Someone will truly feel happy with this shiny card, hey???

Here are some close ups of these two cards:

Thank you so much for joining me today! I’ll be back tomorrow with another post using this awesome kit! To close, how about I just show you another pic of the May Sorbet Kit, huh? You might just need to have an opportunity to drool over it before you run to the shop to get one of your own. 🙂

ck-may17-kit-1_1_orig

And just to help ease your scrolling fingers, I include another link to the kit right HERE.

Until to tomorrow!

ck_dt17-headshots-melissa


2 Comments

The Finishing Touch {Locker Room}

Blog Image_Locker Room

Hi friends,

Melissa here with you today and I’m sharing a couple cards using the awesome March Kit – Play. For this post, I’ve got a Cards with Melissa video for you. In this video, I’m taking two cards and showing you how to add the finishing touches with embellishments.

Specifically, I’m using the enamel dots and wood buttons that you can find, as add-ons, in the shop with the March kit.

hi2

Aren’t those buttons adorable?

For this first card, in the video, I’ll be showing you a card that I’ve already placed the papers, and even a couple of die cuts. But, it was missing something. I’ll show you the thought process to how I chose the buttons, and triangle enamel dots, and even get into the detail of why I chose to place them in the direction that I did.

loveyou2

For this second card, I’m showing you how simple embellishments, like the enamel dots and wood button, really do help ground and add that perfect finishing touch.

Are you ready for the video? Enjoy!

Here are the two cards in their full glory.

hi1

loveyou1

Thanks for joining me today!

ck_dt17-headshots-melissa