Clique Kits

Click. Connect. Create.


Leave a comment

Yearbook: Adventure

Hi ladies. I am back today with another fun layout I created using the September Sundance kit. The patterns and die cuts in this month’s kit is so pretty. I love them. I’ve had these photos for a few months now, but didn’t have the right papers and embellishments to go with them. I pulled the blue and cream colors from the photos to create a well balanced layout.

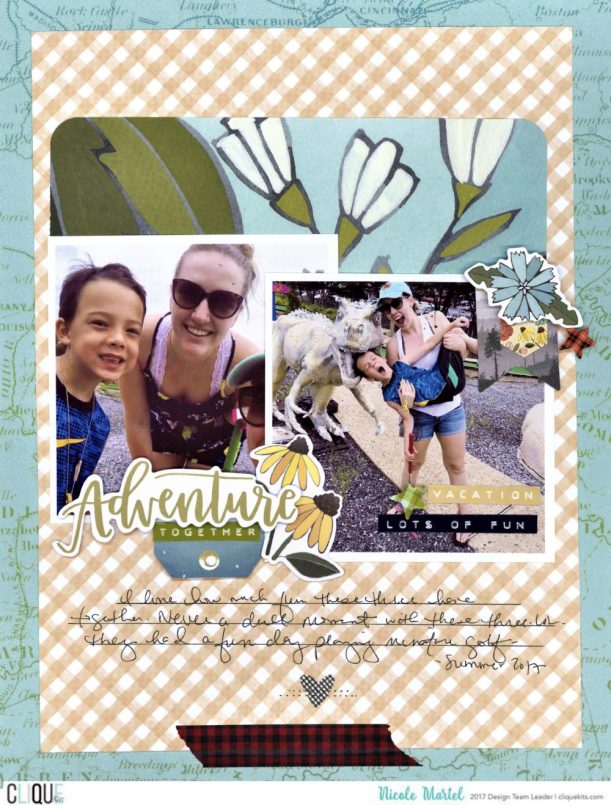
I wasn’t sure at first if the washi would go with this layout, but I managed making it work by adding the tiny red plaid star sticker to help pull the red into the layout. I used a pen and ruler to create faux stitching on the heart sticker.


I layered several die cuts together at the bottom of the photo to help pull the photos together. And to balance it out, I added a few more at the top right photo in the corner. Then I added my hand-journaling to complete the layout.

Thanks so much for visiting today!

-Nicole


1 Comment

Art Studio: Smile

Hello everyone. I am sharing a fun mixed media layout with you today using lots of pretty products by Elle’s Studio from the July kit and some stamps by Altenew! Also, I finally tried out my Shimmerz Paints Creameez. Love how soft these watercolor paints look in the background.

I used some stamp ink pads and water color paints to color white cardstock teal and purple then stamped the flowers on top and cut them out to use as an embellishment for my layout.

I added a few embellishments along the right side of the photo strip.

I stamped “Hello Sunshine” at the bottom using a minty color ink and added a few acrylic hearts!

I cut the striped patterned paper into a banner to use for my layout. I added a puffy sticker and journaling right onto the strip to save room on my layout for all of the embellishments.

Thanks for visiting today!

-Nicole


2 Comments

Art Studio: Favorite


Hello  everybody! I am sharing my very first layout using the July Clique Kit. I love the pretty papers and embellishments in this kit. And I really like the Pretty Little Studio paper, flair and transparency. Fun kit! The colors make me so happy.

I tried to keep this layout simple by adding some yellow and blue Shimmerz mists in the background. I added a 1/4″ border around the edge of the white cardstock using a ruler and a black pen. And because I couldn’t get enough of the pretty transparency, I cut the “always” image out using scissors and added a puffy sticker on top of the transparency and adhered it to the bottom of the layout.

I cut the flowers from the Pretty Little Studio cut-apart paper and used a foam square to make the middle of the flower pop off the page. The leaves are actually Altenew stamps!


I used the transparency to cover one of the die cut tags above the photos. And I tucked strips of paper “branding strips” slightly behind the photos.

We hope you love this month’s kit as much as we do! Thanks for visiting today.

-Nicole


1 Comment

Geek Lab: Me

Hi everybody. Nicole here with a layout I created using goodies from the shop! If you haven’t been to the shop, you might want to take a look. We have some fabulous product marked down! And yes, everything used on this layout is available in the shop, but hurry because they might not be available for long.

For this layout, I decided to use the Pink Paislee “Cest La Vie” paper pack, acetate alphas, stickers and Jillibean Soup’s vellum foil tag.


I really like the patterns in the acetate paper that comes in the paper back so I decided to use the vellum tag to cut part of the patterned from the acetate paper to layer on the tag. I must say, it looks so pretty!

I cut several pieces of patterns, sentiments, shapes from the cut-apart paper and acetate to use as die cuts for this layout since I did not have any on hand.

I love patterned paper because the possibilities are endless. You can mix patterns to create a fun background for your layout, cut the paper into a patterned using a Silhouette or cut bits and pieces/sentiments from the patterns to use as die cuts for your layout.


Before adhering the acetate embellishments to your layout,, make sure you peel the plastic film off… Let me just say, I did not…

Thanks for visiting today. Be sure to check out the shop today for some great deals!

-Nicole


2 Comments

Art Studio: Happy Moments

Hello scrappers. I’ve been anxiously waiting to share this layout with you.  When I started creating this layout, I had no idea what I was going to do. The one thing I was sure of, is that I wanted to use lots of patterned paper. The papers in this months’ kit are so pretty. Wouldn’t you agree. It’s hard not to use them all. LOL I even cut the branding strips from the papers and used them as a fun border for my layout on the left-side of the layout.

I’ve had an acrylic frame in my stash for some time now and after watching Finnabair share the new Metallique Paints, I was inspired to use some of the Metallique paints from my stash. I painted the frame using the Deep Waters and Blue-Gold paints. SOOOOO Pretty! I love how vibrant these paints are.

I fussy cut the flowers from the floral paper and added buttons and jewels from my stash to the center of the flowers to add more texture to the flowers. I used foam squares to adhere them to the layout.

Here is a closer look at the branding strips used on this layout.

I fussy cut the butterfly from one of the patterned papers to use as a die cut for the bottom right-side of my layout.

Thank you for visiting today!


2 Comments

Clique Agenda: September Planner Page

Happy Monday scrappers! I’ve just spend the past hour searching through my purse for my notes and  reminder cards for upcoming dental appointments for the month of September. If I don’t write them down, I will forget. My memory isn’t as good as it used to be. LOL

This month, after I finished creating the layouts I wanted to make using the June Kit, I decided to use the leftover scraps and die cuts to embellish my planner page for September.

I used adhesive to adhere two cards back-to-back from Clique Kit’s exclusives to add to my planner page. The “You Don’t Have To Be Perfect To Be Amazing” sentiment inspires me! Love it. I used gluedots to adhere the “She Belongs With Wildflowers” sentiment to the other card with the words. A girl can never have too many inspiring quotes in their planners to get them through their days.


Each month, not only do I write down dental and doctor appointments, but I also include things such as water plants, laundry, clean the kitchen etc. to keep me on track.

If you’re looking for a few fillers for your planners, check out the Clique Kits Shop, we have a variety of embellishments to help you get your plans started!

Thanks for visiting today,

-Nicole


4 Comments

Geek Lab: Beautiful You


Happy Friday friends! I am excited to share my first layout using the June kit! I love Cocoa Vanilla’s Wild at Heart collection and I hope you love this month’s kit as munch as I do. As soon as I saw the butterflies, I was in love. Seriously, I can’t get enough of them. They are a personal favorite of mine and they never seem to get old.

I used this month’s digital cut file to help embellish my layout. Initially, I was going to keep it white, then opted to use some Shimmerz Paint to color it green. If you’re looking for other cut files besides florals, check out Clique Kit’s Digital Shop!

For those of you who follow my work, I love layering embellishments and papers together on my layout. I layered some of the pieces from the digital cut file with the Cocoa Vanilla die cuts. I had some enamel dots from my stash that I used to decorate the center of the flowers.

What do you think of this month’s flair? Naturally, I love it because it’s blue; my favorite color. I couldn’t decide where I wanted to place the flair so I decided to cluster the flowers and flair along with the butterfly.

Here are a few other close up photos.

Thanks for visiting today and don’t forget to check out our Digital Shop!

-Nicole


3 Comments

Geek Lab: Happy

Hi everyone. Hope you’ve had a wonderful week. Today, I have a fun layout to share with you using the beautiful Jellybean kit. I love patterned paper and die cuts. I can’t seem to get enough of them these days. I used several scraps of patterned paper for this layout. The stripe paper and heart stickers came from my stash because I needed another piece of patterned paper to help mat my photo.


I played with several stickers and die cuts. I love the fun border I created at the bottom of the layout. Totally fun and super easy to do! I used foam squares to make a few of the die cuts pop off the page.


Thanks for visiting today!

-Nicole


2 Comments

Geek Lab: Favorite

Happy Sunday friends! I’ve been playing with the gorgeous May Kit. I love Pinkfresh Studio’s products. Their designs are so fresh and fun and I just love them. If I could, I’d decorate my walls in my scrapbook room with their pretty papers, but since that is not possible, I will share a layout where I mixed three different patterned papers together. I LOVE the little houses and plants on this paper. SOOOO cute.

I tried to keep the layout pretty simple, adding a few special touches here and there. I used the “favorite” die cut as my title at the bottom of the layout to help frame the photo. Then I added the flower pot die cut and the puffy star sticker to make the die cut more interesting and to add more texture to my layout to avoid a flat appearance.

I hand cut the paper to create a fun border for the top and bottom of my layout to help frame the layout.

Thanks so much for stopping by today. Have a wonderful weekend!

-Nicole


2 Comments

Art Studio: Right Now

Hi everyone. I am so excited to share my first layout using the fabulous Jellybean Kit. The colors in this month’s kit is so vibrant and pretty; I love it. Before I started embellishing this layout, I sprayed yellow and blue spray mists by Shimmerz Paints on to white cardstock. I used a paper towel to dab the excess ink off the paper so it wouldn’t bulk up. Then I used a honeycomb stencil and ink to create a fun border across the middle of the layout in pink and orange. I used yellow and blue paint to alter the wood veneer. I wanted this layout  to be as colorful as possible.

I purchased the Add-On paints and puffy stickers from the April Shop. I am so glad I bought them because I am loving how smooth the Shimmerz Paints are and the puffy stickers are absolutely beautiful… you have to see them in person. They also feel like they are made from nice quality material.

I paired up a heart die cut with a heart puffy sticker to make the heart more interesting. I love adding layers to embellishments. And here is my layout. Our design team Maryam Perez created the journaling cards that I used on this layout. I love them all.

Thanks for visiting today. I hope I was able to inspire you to use mist and some acrylic paints on your next projects! It’s so much fun and once you get started, it’s not as scary as you might have thought. 🙂

-Nicole