Clique Kits

Click. Connect. Create.


1 Comment

Yearbook: Summer Fun

Hi! It’s Donna here sharing another layout using the August “Malibu” kit, exclusive cut files and printables.

20121311_10209396396442132_5681943947058556093_o

20106836_698221963695975_3812447161498738528_n

I always get stumped when it comes to scrapbooking multiple photos in a layout. How do I make it work without making it too crowded? How can I make the design interesting?

Then an idea occurred to me while staring at this.

DSC_7371

Create a folding mini-album! It’s not a unique idea and has been used several times but it’s fun so why not do it once in a while.


I used a piece of 12×12 cardstock and folded 4 times. The width and height depend on the sizes of your photos. I adhered in place the last fold/panel.

Donna-CKMalibu-lAYOUT041a

Donna-CKMalibu-lAYOUT042

Donna-CKMalibu-lAYOUT043

I used foam tapes to create a space so I can insert another photo underneath.

Donna-CKMalibu-lAYOUT046

Fun and interesting way to add multiple photos in a single spread.

Donna-CKMalibu-lAYOUT047

Donna-CKMalibu-lAYOUT045

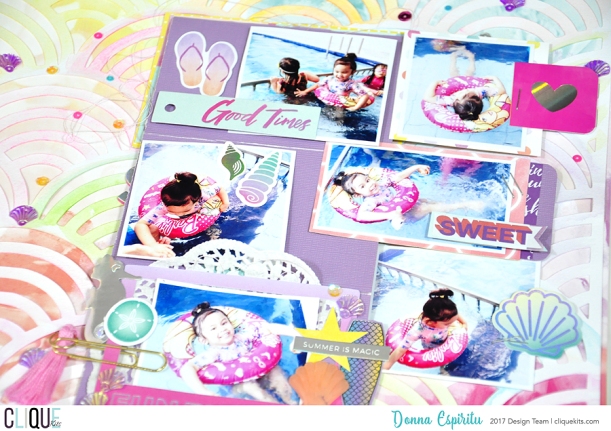
I also made this tassel so the mini-album will stay folded.

Donna-CKMalibu-lAYOUT044

That’s all from me today! I hope you like my project as much as I do! ❤

Thanks for dropping by and happy crafting,

CK_DT17-headshots-Donna


2 Comments

Art Studio: Summer Chillin’

Hello!
Donna here today with my second project using the August “Malibu” kit featuring Pink Paislee Summer Lights collection

ck-aug17-mainkit-sneaks2_orig

I also used this super cute exclusive cut file designed by Inna Moreva (July 2017 cut file – Sunshine) from the Digital Shop

s254461307115203172_p1860_i10_w640

and exclusive printables (Main kit and TN printables) you can find in the Digital Shop as well.

First off, here is a step-by-step tutorial how I created the layout:

  • You will need two cardstocks – 1 for the cut file and 1 for the base where you will adhere the cut file. Adhere the negative part of the cut file to the other cardstock, set the ‘good or positive’ cut file aside.

aug16---art-studio-tut1

  • Using a piece of plastic (any will do, just make sure it’s clean), spread watercolor (or any medium you prefer, diluted in water) to the surface. Start with one color first and build up the layers one after another.

aug16---art-studio-tut3

  • Add another color to the edges, spreading the diluted color with your fingers

aug16---art-studio-tut4

  • While the base is drying (or you can use a heat gun to help it dry faster), use different patterned papers as backing to the Sunshine cut file (I used a pencil to trace the floral parts of the cut file and cut manually with scissors).

aug16---art-studio-tut2

  • Once the base is dry, adhere the Sunshine cut file backed with patterned papers. Use foam tapes to add dimension to the cut file.

aug16---art-studio-tut5

  • Start embellishing

aug16---art-studio-tut6

And this is how my layout turned out

Donna-CKMalibu-Layout03

I added some fun details like this wavy flag and clusters of sequins and stickers.

Donna-CKMalibu-Layout03a1

Donna-CKMalibu-Layout03b1


Different heights added interest to the overall look of the whole page. Here, I used different thickness of foam tapes to adhere the photo and other embellishments like stickers and word arts.

Donna-CKMalibu-Layout03c1


The holographic embellishments are so pretty in person!

Donna-CKMalibu-Layout03fDonna-CKMalibu-Layout03d1


Donna-CKMalibu-Layout03e1

That’s all from me today but I will be back in a few days to share another project with you all.

Thanks for dropping by and happy crafting,

CK_DT17-headshots-Donna


4 Comments

Geek Lab: Mermaid (in the bath tub)

Hello! Donna here for my first layout using the August “Malibu” kit featuring Summer Lights by Pink Paislee

ck-aug17-mainkit-1_1_orig

I used the August cut file “Scallop” as a stencil. Instead of paper, I used an acetate (A4) and run it through my Silhouette Cameo machine (I selected “Stencil Material” in the material type option). This will ensure I can use the stencil over and over again! How cool is that?? Cutting just took a bit longer than usual but it’s worth it.

Donna-CKMalibu-Layout02-tut1

1. Figure out where you want the photo. Then place the scallop stencil on the white cardstock and brush watercolor randomly.

Donna-CKMalibu-Layout02-tut2

2. Use a piece of plastic to spread the watercolor while it’s still wet.

Donna-CKMalibu-Layout02-tut3

3. Flicker the brush to create splatters. The farther the brush, the bigger the splatter will be. Let it “sit” for a few minutes.Donna-CKMalibu-Layout02-tut4

4. Then, use a tissue to blot off the excess water. Your background is ready to be used! I love how the scallops look like rainbow waves.

Donna-CKMalibu-Layout02-tut5

This is my finished layout

Donna-CKMalibu-Layout02

I cut out the ombre pink hearts and scattered them all over the page. I mounted some with foam tape for dimension.

Donna-CKMalibu-Layout02a

I mounted the framed photo with foam tape as well and tucked some messy thread and sequins under it.

Donna-CKMalibu-Layout02cDonna-CKMalibu-Layout02d

Some more close up images

Donna-CKMalibu-Layout02bDonna-CKMalibu-Layout02e

Would love to hear what you think of my project today! Just leave a comment if you have any questions and will happily answer them as much as I can.

Thanks for dropping by!

Happy crafting,

CK_DT17-headshots-Donna


4 Comments

Clique Agenda: June 2017 Monthly Spread

Hello, CK friends!

Donna here sharing my last post for this month of June using the Aquarelle kit.

ck-jun17-mainkit-6_1_orig

as well as some of the exclusive printables in the kit

ck-jun17-cliqueprints-web3_3_orig

First, let me show you one of the tricks I learned along the way. I’m sure I am did not come up with this original idea but I will share it anyway. I use a template as you see in the image, to cut the tiny little squares in my monthly spread.

It’s not really perfect but the difference is not that noticeable, so it’ll do. First, I measured one of the squares and used this tag (it’s quite sturdy so it can be used over and over again) as a template.

DONNAESPIRITU-AQUARELLE-PLANNER02

Use a pencil (so you can erase afterward) and trace around the area you want to cut. I keep this template nearby so it’s ready when I need it.

DONNAESPIRITU-AQUARELLE-PLANNER02a

Here is how I decorated my monthly spread for June using the kit. (Note: stamp used from my stash and not included in the kit).

–Before the pen–

DONNAESPIRITU-AQUARELLE-PLANNER02b

–After the pen–

I just love those butterflies!!! DONNAESPIRITU-AQUARELLE-PLANNER02cDONNAESPIRITU-AQUARELLE-PLANNER02d

I hope you liked my project today!

Thanks for dropping by!

Happy crafting,

CK_DT17-headshots-Donna


1 Comment

Geek Lab: Shine Like The Stars

Hello, everyone!

Donna here with another layout I created using the June kit “Aquarelle” featuring the gorgeous collection Wild at Heart by Cocoa Vanilla Studio.s254461307115203172_p1805_i1_w1200

First, let me show you how I used one of this month’s cut files and the canvas star.

I remembered I have these metallic acrylic paints and thought I’d use them for this project. I combined green and blue metallic acrylic paints to color the cut file. Then used a gold paint marker to color the middle part of the cut file. I also used a pink metallic acrylic paint to color the canvas star. After it has dried, I used gold embossing powder (brushed embossing ink randomly first) and set it with a heat tool. I like the sparkly effect afterward.


Here is my finished layout

DONNAESPIRITU-AQUARELLE-LAYOUT02_

I cut 3 strips of patterned papers and adhered to the left and right sides. I used the same acrylic paints to splatter colors onto the white cardstock. Just a few to add subtle colors.

DONNAESPIRITU-AQUARELLE-LAYOUT02_1

I used a couple of the journal cards as mats to the photo and a couple of the frames as well.

DONNAESPIRITU-AQUARELLE-LAYOUT02_2

I love the effect of the metallic acrylic paints!DONNAESPIRITU-AQUARELLE-LAYOUT02_3

I used the canvas star as a base and clustered a few die cuts and flair on it.

DONNAESPIRITU-AQUARELLE-LAYOUT02_4

That’s all from me today! Don’t forget to check the store for some fab deals!

Happy crafting,
xoDonnaxo


3 Comments

Yearbook: Smile

Hello!

Donna here today to share my second project using the June Kit “Aquarelle”.

s254461307115203172_p1805_i1_w1200

One of the things I love about the monthly kits is their exclusive cut files and printables. You can find all of them here.

For my layout, I used one of this month’s exclusives. The Floral Crown cut file.

s254461307115203172_p1804_i8_w640

Before showing my layout, I want to share how I “weed” through cut files especially intricate ones like the Floral Crown cut file.

DSC_6534

I use a spatula like the one in the image to lift each cut carefully. I find this very helpful especially when I use a new mat (it’s super sticky compared to mats that have been used several times already).DSC_6535

I love how my layout turned out with the cut file and fussy cut flowers and butterflies. The watercolor effect in the Wild at Heart collection by Cocoa Vanilla Studio is just beautiful!

DONNAESPIRITU-AQUARELLE-LAYOUT01


I lined up the series of photos in the middle and I used scraps of thin cardboard to add a bit of height to them. I also added some messy threads under the photos.

DONNAESPIRITU-AQUARELLE-LAYOUT01A

DONNAESPIRITU-AQUARELLE-LAYOUT01C

This rubber charm is just so pretty!

DONNAESPIRITU-AQUARELLE-LAYOUT01B

DONNAESPIRITU-AQUARELLE-LAYOUT01D

That’s all from me today!

I hope you liked my project today and don’t forget to check out more cut files and printables in the store!

Happy crafting,

CK_DT17-headshots-Donna


4 Comments

Yearbook: You go girl

Hello!

It’s Donna here for my last project using the April “Jellybean” kit.

ck-apr17-kit4_orig

Here is my scrapbook layout I made for today

DonnaEspiritu-CliqueKits-April-Jellybean-layout03

I wanted to use the “You go girl” word art cut file so bad but I was stumped which photo to use (adding that my printer isn’t working yet so I had to choose from the ones I’ve already printed). I try to remember the stories behind each photos and I decided to use this one photo of my daughter slumped on the floor with lots of Hello Kitty shoes. We were there to buy shoes but it’s not the kind we were looking for at that time. She wasn’t even two yet when this was taken and she knew what she likes already and kept on saying “Kitty” while gathering ALL the HK shoes she can find. So I focused my journaling on how I wish she grows up to be a strong-willed individual who knows what she wants in life.

Good thing I cut the word art already before my printer broke. But I used a plain white cardstock. Since the Silhouette studio software is still crashing when I try to open on hubby’s computer, I had to use my good old scissors to cut around the paper that I used as backing. I did this twice since I wanted to use this colorful Bella Blvd paper and the polka dot Paige Evans paper as well. I adhered the white cardstock first and carefully cut around it, alternating my scissors and sharp cutter. Then I adhered it again on the polka dot paper. I used a thin cardboard to add a bit of height to the big title.

DonnaEspiritu-CliqueKits-April-Jellybean-layout03b


I love the colors in the kit but I need some black to somehow “balance” the look I’m going for. So I used the b/w bag which stores the embellishments in the kit. And then I used the polka dot vellum paper to make a little paper clip bow.

DonnaEspiritu-CliqueKits-April-Jellybean-layout03a

I doodled randomly as well using my PITT pencils.

DonnaEspiritu-CliqueKits-April-Jellybean-layout04

I used mists/paints to create splatters. You can find similar products in the store especially the April Product of the Month Acri-Tonez Shimmerz Paints.

DonnaEspiritu-CliqueKits-April-Jellybean-layout03e

I maximized the remaining doily from the kit by cutting it in half.

DonnaEspiritu-CliqueKits-April-Jellybean-layout03d

That’s all from me today!

Happy crafting,

CK_DT17-headshots-Donna


2 Comments

Clique Agenda: April planner spread

Hi! Donna here for the third time in a row this week and I hope you’re not yet tired of me. For today, I am sharing how I setup my first two weeks of April using the Jellybean kit. I used my A5 Prima planner which is my planner for all my design team stuff.

DonnaEspiritu-CliqueKits-April-Jellybean-Planner01e

I started by coloring the alpha stickers with watercolor. This is pretty fun to do, just color the letters you want to use so it’s not that messy. Let it dry first before unsticking the alpha stickers so it won’t tear.

DonnaEspiritu-CliqueKits-April-Jellybean-Planneralpha

Then I cut a strip of patterned paper and adhered to the inner edges of the insert where you cut the holes. I also used watercolor to add some colors to one of the doilies I used in my spread.

DonnaEspiritu-CliqueKits-April-Jellybean-Planner01c


I turned one of the flairs into paper clip as well as one of the flowers in the pack

DonnaEspiritu-CliqueKits-April-Jellybean-Planner01d

I also made use of the journal cards as you here in the image below.

DonnaEspiritu-CliqueKits-April-Jellybean-Planner01b

DonnaEspiritu-CliqueKits-April-Jellybean-Planner01a

Notice the stamped words? Since I don’t have a nice pink ink available, I used watercolor instead. (The little one decided she likes to turn the poor stamp into teeny tiny pieces.. RIP to my one and only pink ink lol!). Just a bit of water, almost dry brushing watercolor onto the word in the stamp (like coffee and love) and gently stamp on to the surface. The stamps I used were by Latina Crafter.

DonnaEspiritu-CliqueKits-April-Jellybean-Planner01

That is all from me today!
Thanks for dropping by!

(Note: Date stickers not included in the kit. It’s a digital file I printed and cut with my Silhouette Cameo)

Happy crafting,

CK_DT17-headshots-Donna


5 Comments

Art Studio: This is bliss

Hello! Donna here once again!
Will be sharing my second layout using the April kit, “Jellybean”.

ck_apr17_logo-final-012

I used the floral cut file again, using the same technique I did on my first layout I posted yesterday.

DSC_5230

I brushed gel medium inside the floral cut file, adhering them at the same time. After it has dried, I used my watercolors to color inside the cut files. I mixed various colors, based on the floral included in the embellishment pack.

DonnaEspiritu-CliqueKits-April-Jellybean-layout02aDonnaEspiritu-CliqueKits-April-Jellybean-layout02bDonnaEspiritu-CliqueKits-April-Jellybean-layout02e

Then I used one of the journal cards to mat the layers of photo and doily for a bit of height and some messy thread for a bit of texture. To make the white small alpha stickers stand out, I matted the alphas to one of the colorful patterned papers in the kit.


DonnaEspiritu-CliqueKits-April-Jellybean-layout02c

DonnaEspiritu-CliqueKits-April-Jellybean-layout02d

This is how the layout looks like.

DonnaEspiritu-CliqueKits-April-Jellybean-layout02

I hope you like it!

Thanks for dropping by.

Happy crafting,
CK_DT17-headshots-Donna


4 Comments

Geek Lab: You and Me

Hello!!! It’s Donna here and I’m very excited to be back on the CK Design Team!

For my first post and project, I will be sharing a layout using the April 2017 kit, “Jellybean”ck-apr17-kit4_orig

I love the foiled word arts in some of the papers and that’s the first inspiration on this layout.DonnaEspiritu-CliqueKits-April-Jellybean-layout01
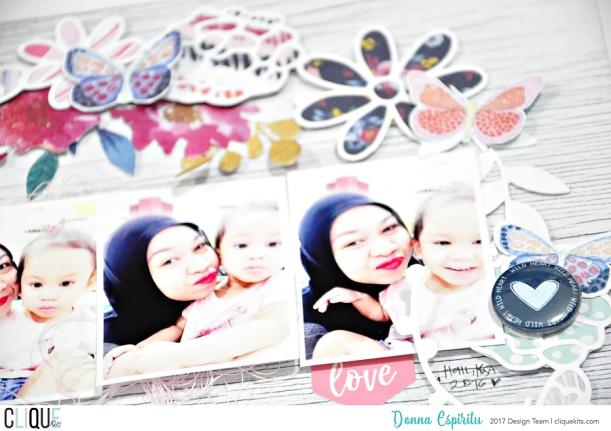
I didn’t plan to have a monochromatic layout, honestly. I ended up choosing teal/blue with black colors so that’s what I went with.

I fussy cut the words you + me (and later on couldn’t find the “+” cut out so it didn’t make into this layout).

DonnaEspiritu-CliqueKits-April-Jellybean-layout01c

I adhered the floral cut files using gel medium. Then I used watercolors (blue, black) and PITT pencils to color the cut files. I started with the light blue colors first and then mixed the black watercolor later on, creating a grayish blue shade.

DonnaEspiritu-CliqueKits-April-Jellybean-layout01a

DonnaEspiritu-CliqueKits-April-Jellybean-layout01d

I also used watercolors as ink to stamp the word “love”. Scattered it around the layout. The stamp is from Latina Crafter. I scattered the hearts and stars from the foam word stickers by Freckled Fawn. And did the same with the black enamel dots from Freckled Fawn as well.

DonnaEspiritu-CliqueKits-April-Jellybean-layout01b

DonnaEspiritu-CliqueKits-April-Jellybean-layout01f

I have a problem with my printer but good thing I got this 1 photo printed correctly. I didn’t want to just throw the rest away so I used them and layered them like you see here. I also love using layers of messy thread to add a bit of texture

DonnaEspiritu-CliqueKits-April-Jellybean-layout01e

I distressed the edges of the paper in the middle a little bit after cutting about half an inch to make it a little bit smaller. Then I used the blue/green stripe patterned paper as a mat.

That’s all from me today. I hope you liked it!

And see you again tomorrow!

Happy crafting,

CK_DT17-headshots-Donna