Clique Kits

Click. Connect. Create.


Leave a comment

Yearbook – Explore

13708352_10206587466700644_3123589168410663782_o

Hello, Clique friends. Today I’m bringing a new layout created with the gorgeous September Sundance kit.

CK_Sep17_MainKit-24

My goal for this page was to include multiple pictures. Although I tend to make one-photo layouts, sometimes I feel like that is not enough to document a story or capture the little details. Here you can see my oldest daughter playing the ukulele. I love how focused and passionate she gets every time she plays. Nothing can distract her! Those three pictures needed to go together on one page 🙂 I reduced their size to measure about six inches in length all together. It was like working with one 4×6” photo.

egudor_September15_Yearbook

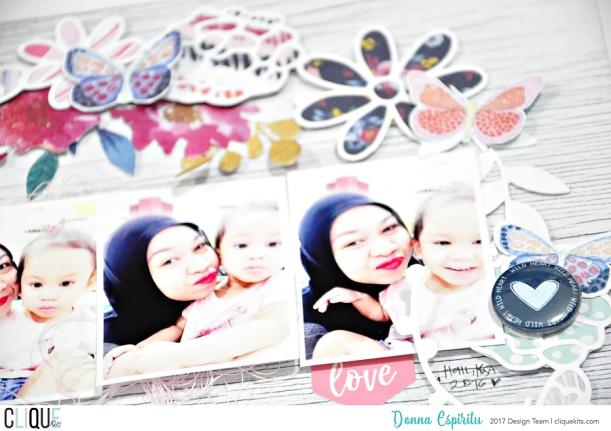
I started by fussy cutting several flowers from one of the 1Canoe2 patterned papers that came in the kit. I was planning on having a white background and wanted to include pops of color and dimension by adding those cut outs here and there. To bring in more interest, I decided to use a cut file from my stash to cover a little more than half of the page. I love the tone-on-tone look. It is subtle but definitely noticeable.

egudor_September15_Yearbook_CloseUp3

I adhered the three pictures together on layers of card stock and popped them up with some foam. The leaves and additional flowers you see on the right-hand side were fussy cut from another paper in the kit. I like how the pink brings in an extra element of color. It also created the perfect spot for the acrylic words and heart. Enamel dots finished the layout.

egudor_September15_Yearbook_CloseUp1

egudor_September15_Yearbook_CloseUp2

I hope this has inspired you to get creative with your kit and include multiple photos on your pages. This kit is absolutely lovely and very versatile. Get yours before it’s gone!

Thank you for stopping by! Have a great day!

Enza


2 Comments

Yearbook – Let’s Go

Hello! It’s Réka and today I’m sharing my latest layout with you from my yearbook, using the ’Sundance’ Traveler’s Notebook Kit. One of my favorite part of the kit is the embellisment which I really love using.

ck-sep17-tnkit-9_1_orig

For my layout I have printed my photo in A4 size on the white cardstock which became the base of it.

0

I have created one vertical cluster with some embellishments from the top to the bottom, at middle part of my layout. I have used the Let’ s go and hearts die cuts from the Pretty Little Studios: Wish You Were Here collection and some stickers, also  from the same collection which came with the kit. The flowers, which were fussy cut out of one PL card from the main September’s printables also went on my layout. The Journey word was cut the stars green paper from the Pretty Little Studios: Wish You Were Here 4×6 Paper Pack with my cameo.

IMG_0556

Finally, I have made a little pocket on the back side of the page and I have put in one tag from the Pretty Little Studio Baggage Claim Shipping Tags package and I can write this day’s story here.

IMG_0558

I love using the hidden comment on my layout and now I am doing this.

IMG_0563

I hope you have found some inspiration for your next project. Thanks for stopping by and have a wonderful day! Réka


1 Comment

Yearbook: Summer Fun

Hi! It’s Donna here sharing another layout using the August “Malibu” kit, exclusive cut files and printables.

20121311_10209396396442132_5681943947058556093_o

20106836_698221963695975_3812447161498738528_n

I always get stumped when it comes to scrapbooking multiple photos in a layout. How do I make it work without making it too crowded? How can I make the design interesting?

Then an idea occurred to me while staring at this.

DSC_7371

Create a folding mini-album! It’s not a unique idea and has been used several times but it’s fun so why not do it once in a while.


I used a piece of 12×12 cardstock and folded 4 times. The width and height depend on the sizes of your photos. I adhered in place the last fold/panel.

Donna-CKMalibu-lAYOUT041a

Donna-CKMalibu-lAYOUT042

Donna-CKMalibu-lAYOUT043

I used foam tapes to create a space so I can insert another photo underneath.

Donna-CKMalibu-lAYOUT046

Fun and interesting way to add multiple photos in a single spread.

Donna-CKMalibu-lAYOUT047

Donna-CKMalibu-lAYOUT045

I also made this tassel so the mini-album will stay folded.

Donna-CKMalibu-lAYOUT044

That’s all from me today! I hope you like my project as much as I do! ❤

Thanks for dropping by and happy crafting,

CK_DT17-headshots-Donna


3 Comments

Soak Up The Sun | Yearbook

Hellooooo! Steph here again with another Travelers Notebook project for you!! Have you signed up for this kit yet?? Because it’s amazing!! CLICK HERE for more info on it. 😉

IMG_4661

For this layout I balanced both pages with strips of pattern paper at the top and bottom. Keeping the colors light and airy, I chose a color scheme that worked well with my black and white photo and was available within my kit. I think this blue distressed woodgrain pattern paper may be my favorite. 🙂

IMG_4663

I used the left side of my layout for journaling and kept it simple so it didn’t get too busy. Then my photograph and title went on the right page.

IMG_4664

I loved this giant phrase die cut!! So cute!!

IMG_4665

I hope you are all enjoying your summers!! Have you created with the Travelers Notebook kit yet? How do you like it??

Xo, Stephanie

Follow me: MY BLOG // FACEBOOK // INSTAGRAM // PINTEREST


3 Comments

Yearbook: Smile

Hello!

Donna here today to share my second project using the June Kit “Aquarelle”.

s254461307115203172_p1805_i1_w1200

One of the things I love about the monthly kits is their exclusive cut files and printables. You can find all of them here.

For my layout, I used one of this month’s exclusives. The Floral Crown cut file.

s254461307115203172_p1804_i8_w640

Before showing my layout, I want to share how I “weed” through cut files especially intricate ones like the Floral Crown cut file.

DSC_6534

I use a spatula like the one in the image to lift each cut carefully. I find this very helpful especially when I use a new mat (it’s super sticky compared to mats that have been used several times already).DSC_6535

I love how my layout turned out with the cut file and fussy cut flowers and butterflies. The watercolor effect in the Wild at Heart collection by Cocoa Vanilla Studio is just beautiful!

DONNAESPIRITU-AQUARELLE-LAYOUT01


I lined up the series of photos in the middle and I used scraps of thin cardboard to add a bit of height to them. I also added some messy threads under the photos.

DONNAESPIRITU-AQUARELLE-LAYOUT01A

DONNAESPIRITU-AQUARELLE-LAYOUT01C

This rubber charm is just so pretty!

DONNAESPIRITU-AQUARELLE-LAYOUT01B

DONNAESPIRITU-AQUARELLE-LAYOUT01D

That’s all from me today!

I hope you liked my project today and don’t forget to check out more cut files and printables in the store!

Happy crafting,

CK_DT17-headshots-Donna


2 Comments

Yearbook | Be Who You Are

blog-image_yearbook

Hey friends! Stephanie Gold here with you today for a Travelers Notebook layout that’s all about you!!

IMG_4155-imp

So how often do you scrap about yourself?? My answer is never, unless I’m directly instructed to haha. I recently turned 30 and in my effort to combat any aging self-consciousness I decided to create a layout all about myself (in a positive way) using a photo I really liked. That last part can be hard but just find one you feel really beautiful in or one that has such a wonderful memory it gives you the warm fuzzies every time you see it. 🙂

IMG_4156-imp

The title of my post came from the quote,

Be who you are, not who the world wants you to be.

Have you seen the GORGEOUS alpha stickers in the new June kit?!!! I. Am. All. Over. Them. They are seriously the best. {Be sure to check out the kit info here!!}

I decided to chop up one of the journal cards which had positive affirmation words and phrases – and use the ones I resonated with to use as my journaling.

IMG_4160-imp

I kept the whole page simple and I love reflecting on it when I get myself into a funk. Being 30 is awesome and a blessing and I need to remember that!! 🙂 Also, don’t forget to check out the latest kit from Clique Kits, the official Travelers Notebook kit!!

Thanks for stopping by with me!! Much love everyone!

Xo, Stephanie

Follow me: MY BLOG // FACEBOOK // INSTAGRAM // PINTEREST


2 Comments

Yearbook – Out Of This World

13708352_10206587466700644_3123589168410663782_o

Hello, Clique friends! I’m back today with a layout featuring the gorgeous May Sorbet Kit. The colors in this kit are absolutely amazing and the exclusives coordinate beautifully with it.

CK Sorbet Kit

The main inspiration for this layout came from one of the background cut files that will be available in the Clique digital store.ck-may17-storecuts-web3_origI initially intended to use the cut file as it is, but then decided to scatter the different size stars around my pictures and layer them to crate a lot of dimension and texture.

egudor_April20_Yearbook_Out Of This World2

Since the patterned paper I chose as my background is very similar in color to the one I used for the stars, I decided to just use pink acrylic paint to create some contrast. I still wanted my layout to have a soft look, so the light colored paint worked perfectly for it.

egudor_April20_Yearbook_CloseUp3

Some of the stars are cut out of vellum. I love the different texture it adds.

egudor_April20_Yearbook_CloseUp1

Once all the stars were positioned as I liked them around my pictures, I started embellishing. I tend to go for a tone-on-tone look most of the times to make the colors stand out more.

egudor_April20_Yearbook_CloseUp4

For my title, I used another exclusive cut file that will be available with the May Sorbet kit.ck-may17-storecuts-web5_origThe Pink Fresh Studio Reverie paper with its gorgeous blue adds the right pop of color the layout needed.

egudor_April20_Yearbook_CloseUp2

I hope you felt inspired today. If you are not a subscriber yet, give it a try. The kits are beautiful. The exclusives are always so unique! You will not regret it! Visit the Clique Kits store for details 🙂

Thank you for stopping by. Have a lovely day!

Enza


6 Comments

Delight | Stephanie

yearbook

Hey friends! Steph here with a fun Yearbook post for you. 🙂 I recently celebrated my 30th birthday and I really wanted to document a trio of silly photos I took with one of my best friends.

IMG_3898-imp

There were so many fun pattern papers in this month’s Jellybean kit that I really wanted to use a bunch of them. I decided to layer strips of some of my favorites and ruffle them a bit for extra texture.

IMG_3900

Since there was so much interest on my page with all of the patterns, I decided to keep my embellishments to a minimum. I journaled on the bottom of my page and created faux “stitches” with black pen marks throughout my page. My title was a simple die cut word from white cardstock that I adhered with staples.

IMG_3901

Such a happy turnout!! This girl is such a blessing and I love that I had the perfect papers to document this fun moment!! Thanks for stopping by! Happy creating!

Xo, Stephanie

Follow me: MY BLOG // FACEBOOK // INSTAGRAM // PINTEREST


6 Comments

Yearbook | Trio

yearbook

Hello!

Today, I am very happy to show you a new layout made with the Play Kit (March kit), that you can buy in the store here. I am totally in love with the bold colours of this kit and I am sure you are too. Don’t forget you can even add some products matching this kit offered in the store.

I love the different die cuts from Shimelle! They add a funny touch to any layout.
And some of them allow to add beautiful journaling spots to your layout. I’ve decided to show you how to use one of them to create an original journaling.

mleluc_march_yearbook

As you can see, I’ve used the little blue typewriter to highlight my journaling. I’ve written my journaling with the computer using the Traveling Typewriter font. It’s important to write the journaling on a narrow piece of paper, as this is the detail that creates the wow effect.

As you may already know, The Cut Shoppe is our sponsor for the March challenge, and I’ve decided to use a cut file for this occasion. Look at the effect on the background! Love that!

mleluc_march_yearbook3

mleluc_march_yearbook5

I also love the Play kit because it can be used for lots of different colour combos. Mine is yellow, navy blue and blue. It was mainly chosen because I used the Bear Hug Paper from the Little by Little Collection of Shimelle.

As I only used the right part, it gave me the colour direction of this layout.

sans-titre

Here is a better look on some parts of my layout. Enjoy!

mleluc_march_yearbook4

mleluc_march_yearbook5

And I have to say I am a little bit sad today, because this is my last blog post on the Clique Kits blog, as I have to leave the team for personal reasons. I want to thank you all the team, Erica, Nicole and Gia for this wonderful experience over the last month!
As the CK kits are full of products, I have lots of products left from past kits, so be sure you will see some other layouts from me made with them!

Have a wonderful day!

avatar


5 Comments

Delight

yearbook

Here I am today, to share a layout I’ve made using the wonderful Hey Sugar January Kit.
Even if I have three boys, this kit is one of my favourite so far… so many fun embellishment and I love the bright colours! These colours are perfect for happy moments with my sons!
And I have quite a few of them to document!

magalileluc_january_delight

As the journaling says, this photo was taken last year.
After the school, I went to a park with my older son to take some pictures of him. He’s not always happy when I do that, but this day, he was so delighted to do that!
We spend a wonderful time together, playing under the tree, finding new angles to take beautiful photos. And he literally played with the camera.

magalileluc_january_deligh3

This is really a very nice memory for me, and I had to document it.
It was Spring and we were surrounded by beautiful colours and flowers.
I created this environment by cutting the Crate Paper flower paper.
I’ve used them to create a border under my photos
to separate the journaling and the photos.

magalileluc_january_deligh2

After placing my photos over the black and white paper, I’ve stitched (with my sewing machine) a white frame to highlight the pictures. I love how delicate it is!

magalileluc_january_deligh4

Don’t forget to check out the Hey Sugar Kit in the Clique Kits website.You will also find the new specialty Valentine Day Kit in the Clique Store.

I am sure you’ll love it!
Have a wonderful day,

Magali