Clique Kits

Click. Connect. Create.


Leave a comment

Field Notes-My Lovely Life

ck-field-notes-traveler-notes-header

Hello again!  Candace back with you today to share my last layout at a design team member for Clique Kits.  I have seriously loved every minute being a part of this amazing team and company ran by some pretty kick butt ladies.  A big huge heart felt thank you to Erica, Gia, Lacey and Nicole!  The last two years have been nothing short of wonderful.  I have learned so much from these ladies and grown not only as a designer but as a person.  Thank you to Gia for always being a cheerleader and making me feel special!  Thank you to Lacey for working so hard on all the digital and other goodies and even letting me help out a few times!  Thank you to Nicole for keeping the team and me moving, creating and motivated.  Thank you to Erica for…well…everything!  Erica is not only the sweetest person to work for, but super talented, has taught me SO much and given me opportunities that have pushed me to learn and grow.  Thank you a million times over for two amazing years!  I hope to work with you ladies again soon!

Now for my final spread…

I love the long road paper in the kit this month and knew that I had to use it on one of my projects. I centered the road on the left side of my traveler’s notebook to act as a full page photo or focal point.

ckcandace1

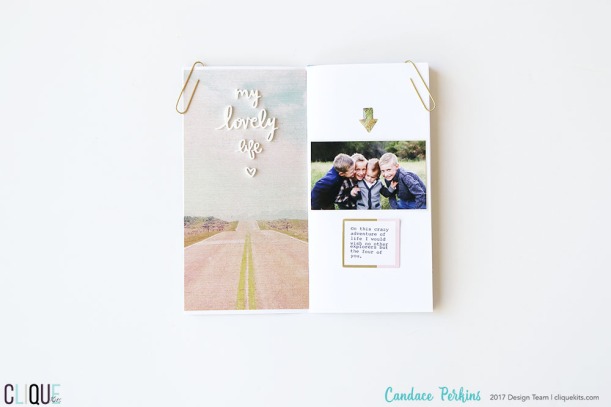
I adhered the title to the top of the paper in a vertical line to keep the design elements moving in the same direction as the photo.

ckcandace2

On the left side of the spread I adhered a cute photo of my boys that almost fit the width of the paper.  I wanted to again keep all the design elements vertical.  To help with this, I added an enamel arrow pointing down towards the photo.  This keeps the eye moving vertically down the spread.

ckcandace3

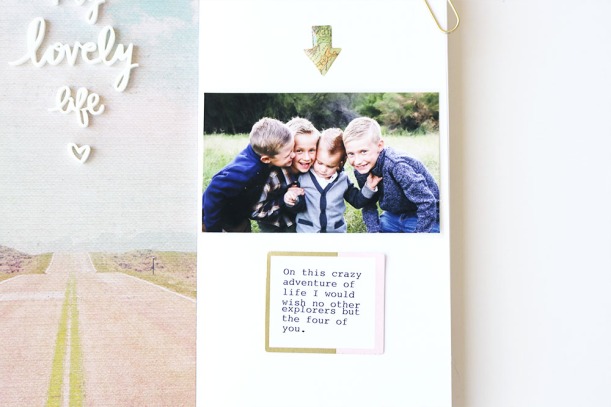
Lastly, I took one of the die cut pieces from the kit and ran it through my typewriter. After adding just a bit of journaling I adhered it under the photo.  I used colors similar to the left side to tie the two sides together.

I love the words and the photos in this little spread and I know that it will be one of those spreads that I will look at often.  Such cute boys!

Thanks for stopping by today!  You can check out the goodies I used for this layout in the shop here.  Have a beautiful day!

Candace


2 Comments

Locker Room-Adventure Mini Album

CK- Locker Room - header

Hello friends! Welcome back to the Clique Kits blog!  Today I am sharing a fun adventure mini album using the September main kit. Like I said in my last post I am just over the moon for this kit!  I love all the dark blues and greens, and woodgrain paper always has my heart. You can pick up the kit in the shop here you can also take a look at all the September shop update here.


20748016_707964989388339_8955602762503223274_o

I love putting little mini albums together and this kit is just perfect for all our family outdoor adventures.

To start the album I adhered the ‘Take a Hike’ die cut to the center of a 4×4 acetate sheet so you could see the beautiful map paper through it.

TakeAHike-1

On the opposite side of the die cut I adhered a wood circle from my stash and added another die cut heart.

TakeAHike-2

When the first page is turned I placed one of the 4×6 journal cards cut down to 3.5×3.5 to the left side of the page and paired it with a die cut and a photo of one of my boys on an adventure hike.

TakeAHike-3

I repeated the process on the next page but switched the orientation. I also adhered the journal card this time on vellum to add a little bit more interest and texture.

TakeAHike-4

I love see through pages and wanted to include another one in the book.  For this one I used a printed sheet of acetate and layered a few embellishments on top.  This way you can still see the photo through the acetate but till you turn the page you can’t see all the details.

TakeAHike-5

To add just a little more detail to the photos,  I added a word strip on the edge of all the 3×3 photo stacks.

TakeAHike-6

On the next page I added a little journaling and die cuts along with an epoxy arrow from the kit.  I adore the little arrows with the map on them!

TakeAHike-7

I wanted the last photo to be covered so I added a full 4×4 card to this page to make sure that the final photo was not seen till the page was turned.

TakeAHike-8

I ended the mini with a photo of our youngest son.  I layered a tag over the photo and added a little burlap bow to mimic the burlap bow at the beginning of the album.

TakeAHike-9

I love how the little mini album turned out.  I am planning on giving it to my husband to keep in his office.  Such a fun and simple project but so meaningful!  This is what memory keeping is all about!

Thanks for stopping by today!  Have a wonderful day!

Candace


2 Comments

Share Your Space-Candace Perkins

Hello friends!  Welcome back to the Clique Kits blog!  Today I am sharing a little about my crafty space.  About a year ago I shared my space on the blog and since then I have really been itching to redo the room.  I decided to just take the plunge and go for it!  I recruited the help of my mom to help me chose the right colors to create a calm and soothing space.

Right now, as you can see below the walls are an olive green…yuck! I really wanted to soften and brighten the whole room and then place dark accents around for a pop of color.

space2.jpg

We went to Home Depot and decided on light grey and tan to compliment the sheer binds that will hang long and drag along the carpet.

cksharespace.jpg

On the wall behind the desk I will mount these Mosslanda picture ledges.

mosslanda-picture-ledge-white__0554975_PE660037_S4.JPG

I will place the Ribba frame in various sizes along the picture ledges with a few accent pieces along the ledge.

ribba-frame-white__0447658_PE597465_S4.JPG

I also picked up one of these cute globes at JoAnns that I will place on the wall.

15487135.jpg


I am SO excited to get started this weekend!  By next week I will have a whole new space! I promise to share an update with you when it is completed!

Have a beautiful day!

Candace


2 Comments

Field Notes-Take a Hike

ck-field-notes-traveler-notes-header

Hello friends!  Candace back with you today and I am so excited to share my first project using the September Sundance kit.  Guys….I LOVE this kit!  It makes this boy mom heart so happy!  This kit is filled with lots of blues, greens, yellows and neutrals with themes that fit our family perfectly!  We love to spend time outdoors and go on wild adventures together.  In case you missed it, here is a look at the kit that you can pick up in the store here.


20748016_707964989388339_8955602762503223274_o

For today’s travelers notebook spread I HAD to use the map paper.  For the left side of the spread I cut the map paper slightly smaller than the full page width so I could create a little border on the far left.  I wanted the left side of the spread to look like the papers were just dropped on the page, very organic.

CKTNHike-1

I added a little backpack embellishment from the die cut pack along with a label for my journaling.

CKTNHike-2

I wanted the right side of the spread to feel more organized and balanced.  I double matted my photo and added another die cut above the photo.  To mimic the border on the left side I added a border strip.  I decided to make the border on the right side a little larger than the right to bring a little more color and balance to the right side.

CKTNHike-3

I just adore how this little spread turned out!  This kit is SO inspiring and when I look at it I am filled with lots of ideas.  I can’t wait to share the rest of my projects with you!  Make sure you pick up this kit, you will LOVE it!

Have a beautiful day!

Candace


1 Comment

Field Notes-Little Memories

CK- Field Notes -traveler notes - header


Hello friends!  Candace back with you today to share a fun summer travelers notebook spread using the July Pool Party kit.  You can checkout the the kit here in the shop and other kit extras here.

ck-jun17-tnkit2_4_orig.jpg

This kit is perfect for documenting all your little summer memories.  I wanted to document one of these summer memories in my spread today.  As I was flipping thru the kit papers one of the geometric papers caught my eye.  I thought it might look fun to cut the paper up and spread it across one side of the spread.

CKlittlememories-1

After I cut the paper and adhered it to the base I was left with a perfect space for the title.  For the title I used the puffy stickers from the kit along with a “little” acrylic piece from my stash.

CKlittlememories-3

To embellish the left side of the spread I collected embellishments from the kit that coordinated with the colors on the cut papers.  I placed the embellishments on the coordinating paper but on various angles to add interest and balance.

CKlittlememories-2

For the right side of my spread I printed out the photo with a large white space on the bottom to mimic the look of a polaroid photo.  I layered the photo on top of the sketchy blue paper in the kit.  I placed my embellishment cluster on the top right hand corner of the photo and added a large “W” to symbolize my little guy’s name.

cklittlememories-4

Such a fun summer spread!  I adore the colors in this kit, so refreshing and full of joy!  Thanks for stopping by today!  On you next spread try cutting up a geometric paper to drive the design of your spread.  You will be surprised by how quick the layout will come together!

Have a beautiful day!

Candace


1 Comment

Field Notes-Dad & Son

CK- Field Notes -traveler notes - header

Hello again!  So happy to be back again sharing a little travelers notebook inspiration.  This is quickly becoming one of my very favorite ways to document the everyday moments.  For today’s spread I used goodies from the new travelers notebook kit & embellishments from the main kit.

ck-jun17-mainkit-6_1_orig.jpg

On father’s day I captured a little photo of my husband teaching one of my sons how to tie his tie for church.  This was such a sweet and delicate moment and I wanted my spread to reflect this feel.

ckdad&son1

I placed my photo on the left side of the spread layered over the beautiful marble paper from the TN kit.  Under the photo I added sentiment word strips that captured my feelings about this special moment.  At the bottom of the spread I added the date on top of a floral label.

ckdad&son2

On the right side of the spread I used stamps from my stash to spell out my title “Dad & Son”. I adore the floral ampersand from the ephemera pack and had to make sure it made its way on to a project this month!

ckdad&son3

To tie the two sides of the spread together I repeated the mint color and the floral embellishments.

ckdad&son4

Another moment captured and documented in my TN!  Thanks again for stopping by today!  We would LOVE to see what memories you are documenting in with our new TN kits.  Make sure you tag Clique Kits when you share your projects so we can swoon over them!

Have a beautiful day!

Candace


5 Comments

Field Notes-Enjoy the Little Things

CK- Field Notes -traveler notes - header

Hello friends!  Candace here with you today to share a quick travelers notebook spread.  I love documenting little everyday moments in my notebook.  Today’s moment captured and documented was my little guy going to preschool. To document this I used the new traveler’s notebook kit along with a few papers and embellishments from the main kit.

ck-jun17-mainkit-6_1_orig.jpg

To start the spread I punched three, 3 inch circles out of various patterned papers in the kit. I chose papers that were light in feel and theme to match my photo.

cklittlethings1cklittlethings2

For my photo stack I layered papers & embellishments from the kit.  I wanted the left side of the spread to feel very organic, like the papers and embellishments just fell on the paper.

cklittlethings3

For the right side I wanted a more organized feel.  I continued the circle theme with my embellishments, over lapping a few of the circles.  I added a large “R” from my stash to represent my son’s initial.

cklittlethings4

To tie the right and left sides of the spread together I repeated the acrylic white stars across the spread.

cklittlethings5

Such a cute and meaningful layout!  I love how it came together and the moment captured and now documented.

Thanks for stopping by today!  Give mixing styles a try on your next travelers notebook spread.  Try mixing an organic and organized style all on one spread!  Have fun!

Candace


3 Comments

Locker Room- Cards

Blog Image_Locker Room

Hello friends!  Candace back with you to play a little today making a few cards and tags using the May main scrapbooking kit & travelers notebook kit.  I love to get both kits every month because they coordinate perfectly and it gives me so much product to play and create with.  You can pick up the scrapbooking kit, travelers notebook kit and extras in the shop.

-kit-1_1_orig

I wanted to create bold cards mixed with the light greens and pinks in the Pinkfresh Studio collection.

ckMayCards-1.jpg

For the base of the tag I used black cardstock from my stash layered with a white doily.  For my sentiment I paired the “Happy” puffy sticker with a stamp from my collection.  My final embellishments to the tag were a little die cut leaf and an adorable button.  Now I have a ready made tag to add to a gift in a pinch!

ckMayCards-2

For this simple card I layered patterned paper from the 6×6 paper pad along with a die cut sentiment, a word strip and button.  I like the simplicity of this card, a simple thank you card is always nice to send.

ckMayCards-3

I love this card with the large drop shadow sentiment.  To create this I die cut the large sentiment out of pattered paper from the kit and black card stock.  I layered all the card stock pieces together but slightly off set the black to create a shadow. To create a little more interest I layered the sentiment over card stock and doily.  For my final touch on this card I added a little thread and the adorable flair.  (I LOVE this flair!)

ckMayCards-4

The last card I created is a tiny birthday card.  The only thing better than a homemade card is a cute, tiny homemade card!  I created this simple card by layering white card stock on a back base.  Next I simply adhered 3 of the cute puffy stickers and added a sentiment strip.  Too cute, right?!

ckMayCards-5

It is always great to have sweet and simple cards and tags on hand for any occasion.  I hope this gave you a few ideas on how to quickly put a few together with this months kit.

Have a beautiful day!

Candace


3 Comments

Field Notes-Dear Ryder

field-notes

Hello again CK friends!  Candace here to share another traveler’s notebook spread.  I love the small format of traveler’s notebooks and the ability to quickly put together a beautiful spread.

My little guy is completely obsessed with Snapchat right now.  He constantly asks if he can see my phone and play.  I love to hear his little laugh as sees his picture change.  I knew I wanted to document this fun little tradition right now.

TN-ckAPRIL-1.jpg

I started with the insert that comes in the new travelers notebook kit.  I love the white pages!  I thought it would be fun to use the word strips from Pinkfresh Studio to write a letter to Ryder about how much I love this time with him.

TN-ckAPRIL-2.jpg

On the left side of the spread I inserted the word strips between sentences from my typewriter.  For the right side of the spread I layered the photo on top of the grey circle paper from the Pinkfresh Studio 6×6 paper pad.

TN-ckAPRIL-3.jpg

To add the final touches to the spread I added a few puffy stickers with bunched up thread underneath for texture and interest. I love the soft colors that play off the cute picture.

On your next spread try adding embellishments or word strips between your journaling for a fun new technique!  You can check out the new travelers notebook kit, or our beautiful scrapbook kit here.

Thanks again for stopping by!  Go make some beautiful memories!

Candace

 -kit-1_1_orig.jpg


3 Comments

Geek Lab-U & I

Blog Image_Geek Lab

Hello friends!  Candace here to share a little Geek Lab with you.  Today I am going to show you how easy it is to place your journaling in the perfect spot on the base of your layout.

For the base of my layout I started with a plain white 8.5×11 piece of card stock.  I was inspired by a layout by Ali Edwards where she created a large title in the middle of the page with journaling to the right side and circles framing the bottom of the page.

I used various circle punches to punch out 3 inch and 2 inch circle photos of my hubby and I along with various papers from this months kit.  Without adhering the circles down I laid out the spread and embellishments to get a good idea of exactly where my title and journaling would go.

After the spread was completely laid out I measured where I wanted the title and journaling to fit.  Next, I opened a new 8.5 x 11 canvas in Photoshop.  I made sure that the rulers were visible by clicking the dropdown menu “View”.

Screenshot 2017-04-21 14.14.05.png

Next, again under the “view” drop down menu I selected “New Guide”.  I created one horizontal guide 1.5inches down from the top and one vertical guide 4.25inches over from the left.

Screenshot 2017-04-21 14.14.53.png

I created a text box and slid it right into the corner of the box the grid created.  By keeping my journaling within the bounds of the grid I knew that my journaling would not interfere with the title or any of my photos and embellishments.

Screenshot 2017-04-21 14.12.56.png

I printed out the journaling on the base of my layout then transferred the title, photos and embelishments.

ckU&I-1

It is just that easy to add your journaling into the perfect spot on your spreads!  Check out the close ups of how the layout came together.

ckU&I-2ckU&I-3ckU&I-5ckU&I-6

ckU&I-4

Thanks so much for stopping by today!  I hope this inspired you to use your computer and customize the journaling on your next layout.  Let me know if you have any questions!  You can check out this months kit in the store here.  Here is another quick look at the kit in case you missed it!

ck-may17-kit-1_1_orig.jpg

See ya soon!

Candace